
diff options
| author | Fotis Voutsas <fotis@netdata.cloud> | 2023-03-27 16:52:33 +0300 |
|---|---|---|
| committer | GitHub <noreply@github.com> | 2023-03-27 06:52:33 -0700 |
| commit | 00fd201803e2e368e98f5903dbe037c2c55bd8af (patch) | |
| tree | a23baab0a2f76c3c1c1f1517e24228d6bdbaa352 | |
| parent | 2a9c0b54b1759c31c99669498cabc5606ecea193 (diff) | |
Address Learn feedback from users (#14802)
* Update collectors/charts.d.plugin/sensors/README.md
* lint the file, and correct some mistypes
* add suggestions and fix wording
* cover feedback by users
* fix broken link
* Update invite-your-team.md
| -rw-r--r-- | claim/README.md | 137 | ||||
| -rw-r--r-- | collectors/apps.plugin/README.md | 3 | ||||
| -rw-r--r-- | collectors/charts.d.plugin/sensors/README.md | 32 | ||||
| -rw-r--r-- | collectors/diskspace.plugin/README.md | 40 | ||||
| -rw-r--r-- | docs/cloud/manage/invite-your-team.md | 17 | ||||
| -rw-r--r-- | packaging/installer/methods/ansible.md | 2 |
6 files changed, 100 insertions, 131 deletions
diff --git a/claim/README.md b/claim/README.md index c524346b57..d4c7d637e0 100644 --- a/claim/README.md +++ b/claim/README.md @@ -1,13 +1,3 @@ -<!-- -title: "Connect Agent to Cloud" -description: "Connecting a Netdata Agent, running on a distributed node, to Netdata Cloud securely via the encrypted Agent-Cloud link (ACLK)." -custom_edit_url: "https://github.com/netdata/netdata/edit/master/claim/README.md" -sidebar_label: "Connect Agent to Cloud" -learn_status: "Published" -learn_topic_type: "Tasks" -learn_rel_path: "Configuration" ---> - # Connect Agent to Cloud You can securely connect a Netdata Agent, running on a distributed node, to Netdata Cloud. A Space's @@ -34,31 +24,33 @@ Nodes** in the [Spaces management area](https://github.com/netdata/netdata/blob/ There are two important notes regarding connecting nodes: -- _You can only connect any given node in a single Space_. You can, however, add that connected node to multiple War Rooms +- _You can only connect any given node in a single Space_. You can, however, add that connected node to multiple War Rooms within that one Space. -- You must repeat the connection process on every node you want to add to Netdata Cloud. +- You must repeat the connection process on every node you want to add to Netdata Cloud. ## How to connect a node There will be three main flows from where you might want to connect a node to Netdata Cloud. -* when you are on an [ -War Room](#empty-war-room) and you want to connect your first node -* when you are at the [Manage Space](#manage-space-or-war-room) area and you select **Connect Nodes** to connect a node, coming from Manage Space or Manage War Room -* when you are on the [Nodes view page](https://github.com/netdata/netdata/blob/master/docs/cloud/visualize/nodes.md) and want to connect a node - this process falls into the [Manage Space](#manage-space-or-war-room) flow + +- when you are on a [War Room](#empty-war-room) and you want to connect your first node +- when you are at the [Manage Space](#manage-space-or-war-room) area and you select **Connect Nodes** to connect a node, coming from Manage Space or Manage War Room +- when you are on the [Nodes view page](https://github.com/netdata/netdata/blob/master/docs/cloud/visualize/nodes.md) and want to connect a node - this process falls into the [Manage Space](#manage-space-or-war-room) flow Please note that only the administrators of a Space in Netdata Cloud can view the claiming token and accompanying script, generated by Netdata Cloud, to trigger the connection process. ### Empty War Room Either at your first sign in or following ones, when you enter Netdata Cloud and are at a War Room that doesn’t have any node added to it, you will be able to: -* connect a new node to Netdata Cloud and add it to the War Room -* add a previously connected node to the War Room + +- connect a new node to Netdata Cloud and add it to the War Room +- add a previously connected node to the War Room If your case is to connect a new node and add it to the War Room, you will need to tell us what environment the node is running on (Linux, Docker, macOS, Kubernetes) and then we will provide you with a script to initiate the connection process. You just will need to copy and paste it into your node's terminal. See one of the following sections depending on your case: -* [Linux](#connect-an-agent-running-in-linux) -* [Docker](#connect-an-agent-running-in-docker) -* [macOS](#connect-an-agent-running-in-macos) -* [Kubernetes](#connect-a-kubernetes-clusters-parent-netdata-pod) + +- [Linux](#connect-an-agent-running-in-linux) +- [Docker](#connect-an-agent-running-in-docker) +- [macOS](#connect-an-agent-running-in-macos) +- [Kubernetes](#connect-a-kubernetes-clusters-parent-netdata-pod) Repeat this process with every node you want to add to Netdata Cloud during onboarding. You can also add more nodes once you've finished onboarding. @@ -74,9 +66,10 @@ When coming from [Nodes view page](https://github.com/netdata/netdata/blob/mast If you want to connect a node that is running on a Linux environment, the script that will be provided to you by Netdata Cloud is the [kickstart](https://github.com/netdata/netdata/blob/master/packaging/installer/README.md#automatic-one-line-installation-script) which will install the Netdata Agent on your node, if it isn't already installed, and connect the node to Netdata Cloud. It should be similar to: -``` +```bash wget -O /tmp/netdata-kickstart.sh https://my-netdata.io/kickstart.sh && sh /tmp/netdata-kickstart.sh --claim-token TOKEN --claim-rooms ROOM1,ROOM2 --claim-url https://api.netdata.cloud ``` + The script should return `Agent was successfully claimed.`. If the connecting to Netdata Cloud process returns errors, or if you don't see the node in your Space after 60 seconds, see the [troubleshooting information](#troubleshooting). @@ -105,18 +98,18 @@ and run the script. ```bash wget -O /tmp/netdata-kickstart.sh https://my-netdata.io/kickstart.sh && sh /tmp/netdata-kickstart.sh --claim-token TOKEN --claim-rooms ROOM1,ROOM2 --claim-url https://api.netdata.cloud ``` + ### Connect an agent running in Docker To connect an instance of the Netdata Agent running inside of a Docker container, it is recommended that you follow -the instructions and use the commands provided either in the `Nodes` tab of an [empty War Room](#empty-war-room) on Netdata Cloud or -in the shelf that appears when you click **Connect Nodes** and select **Docker**. +the instructions and use the commands provided either in the `Nodes` tab of an [empty War Room](#empty-war-room) on Netdata Cloud or +in the shelf that appears when you click **Connect Nodes** and select **Docker**. -However, users can also claim a new node by claiming environment variables in the container to have it automatically +However, users can also claim a new node by claiming environment variables in the container to have it automatically connected on startup or restart. For the connection process to work, the contents of `/var/lib/netdata` _must_ be preserved across container -restarts using a persistent volume. See our [recommended `docker run` and Docker Compose -examples](https://github.com/netdata/netdata/blob/master/packaging/docker/README.md#create-a-new-netdata-agent-container) for details. +restarts using a persistent volume. See our [recommended `docker run` and Docker Compose examples](https://github.com/netdata/netdata/blob/master/packaging/docker/README.md#create-a-new-netdata-agent-container) for details. #### Known issues on older hosts with seccomp enabled @@ -135,9 +128,9 @@ CONFIG_SECCOMP=y To resolve the issue, do one of the following actions: -- Update to a newer version of Docker and `libseccomp` (recommended). -- Create a custom profile and pass it for the container. -- Run [without the default seccomp profile](https://docs.docker.com/engine/security/seccomp/#run-without-the-default-seccomp-profile) (unsafe, not recommended). +- Update to a newer version of Docker and `libseccomp` (recommended). +- Create a custom profile and pass it for the container. +- Run [without the default seccomp profile](https://docs.docker.com/engine/security/seccomp/#run-without-the-default-seccomp-profile) (unsafe, not recommended). <details> <summary>See how to create a custom profile</summary> @@ -193,13 +186,13 @@ it will use these values to attempt to connect the container, automatically addi Rooms. If a proxy is specified, it will be used for the connection process and for connecting to Netdata Cloud. These variables can be specified using any mechanism supported by your container tooling for setting environment -variables inside containers. +variables inside containers. When using the `docker run` command, if you have an agent container already running, it is important to know that there will be a short period of downtime. This is due to the process of recreating the new agent container. The command to connect a new node to Netdata Cloud is: -```bash +```bash docker run -d --name=netdata \ -p 19999:19999 \ -v netdataconfig:/etc/netdata \ @@ -219,10 +212,11 @@ docker run -d --name=netdata \ -e NETDATA_CLAIM_PROXY=PROXY \ netdata/netdata ``` ->Note: This command is suggested for connecting a new container. Using this command for an existing container recreates the container, though data -and configuration of the old container may be preserved. If you are claiming an existing container that can not be recreated, + +>Note: This command is suggested for connecting a new container. Using this command for an existing container recreates the container, though data +and configuration of the old container may be preserved. If you are claiming an existing container that can not be recreated, you can add the container by going to Netdata Cloud, clicking the **Nodes** tab, clicking **Connect Nodes**, selecting **Docker**, and following -the instructions and commands provided or by following the instructions in an [empty War Room](#empty-war-room). +the instructions and commands provided or by following the instructions in an [empty War Room](#empty-war-room). The output that would be seen from the connection process when using other methods will be present in the container logs. @@ -272,6 +266,7 @@ Then run the following command in the same directory as the `docker-compose.yml` ```bash docker-compose up -d ``` + #### Using docker exec Connect a _running Netdata Agent container_, where you don't want to recreate the existing container, append the script offered by Netdata Cloud to a `docker exec ...` command, replacing @@ -280,7 +275,8 @@ Connect a _running Netdata Agent container_, where you don't want to recreate th ```bash docker exec -it netdata netdata-claim.sh -token=TOKEN -rooms=ROOM1,ROOM2 -url=https://api.netdata.cloud ``` -The values for `ROOM1,ROOM2` can be found by by going to Netdata Cloud, clicking the **Nodes** tab, clicking **Connect Nodes**, selecting **Docker**, and copying the `rooms=` value in the command provided. + +The values for `ROOM1,ROOM2` can be found by by going to Netdata Cloud, clicking the **Nodes** tab, clicking **Connect Nodes**, selecting **Docker**, and copying the `rooms=` value in the command provided. The script should return `Agent was successfully claimed.`. If the connection process returns errors, or if you don't see the node in your Space after 60 seconds, see the [troubleshooting information](#troubleshooting). @@ -292,6 +288,7 @@ To connect a node that is running on a macOS environment the script that will be ```bash curl https://my-netdata.io/kickstart.sh > /tmp/netdata-kickstart.sh && sh /tmp/netdata-kickstart.sh --install-prefix /usr/local/ --claim-token TOKEN --claim-rooms ROOM1,ROOM2 --claim-url https://api.netdata.cloud ``` + The script should return `Agent was successfully claimed.`. If the connecting to Netdata Cloud process returns errors, or if you don't see the node in your Space after 60 seconds, see the [troubleshooting information](#troubleshooting). @@ -314,9 +311,9 @@ will also be used to tunnel the ACLK. The default `proxy` setting is `none`. The `proxy` setting can take one of the following values: -- `none`: Do not use a proxy, even if the system configured otherwise. -- `env`: Try to read proxy settings from set environment variables `http_proxy`. -- `http://[user:pass@]host:ip`: The ACLK and connection process will use the specified HTTP(S) proxy. +- `none`: Do not use a proxy, even if the system configured otherwise. +- `env`: Try to read proxy settings from set environment variables `http_proxy`. +- `http://[user:pass@]host:ip`: The ACLK and connection process will use the specified HTTP(S) proxy. For example, a HTTP proxy setting may look like the following: @@ -345,15 +342,15 @@ address or hostname of your Agent. The returned JSON contains four keys that wil might be having with the ACLK or connection process. ```json - "cloud-enabled" - "cloud-available" - "agent-claimed" - "aclk-available" + "cloud-enabled" + "cloud-available" + "agent-claimed" + "aclk-available" ``` -On Netdata agent version `1.32` (`netdata -v` to find your version) and newer, the `netdata -W aclk-state` command can be used to get some diagnostic information about ACLK. Sample output: +On Netdata agent version `1.32` (`netdata -v` to find your version) and newer, `sudo netdatacli aclk-state` can be used to get some diagnostic information about ACLK. Sample output: -``` +```bash ACLK Available: Yes ACLK Implementation: Next Generation New Cloud Protocol Support: Yes @@ -367,7 +364,7 @@ Use these keys and the information below to troubleshoot the ACLK. #### kickstart: unsupported Netdata installation -If you run the kickstart script and get the following error `Existing install appears to be handled manually or through the system package manager.` you most probably installed Netdata using an unsupported package. +If you run the kickstart script and get the following error `Existing install appears to be handled manually or through the system package manager.` you most probably installed Netdata using an unsupported package. If you are using an unsupported package, such as a third-party `.deb`/`.rpm` package provided by your distribution, please remove that package and reinstall using our [recommended kickstart @@ -380,6 +377,7 @@ If you run the kickstart script but don't have privileges required for the actio ```bash Failed to write new machine GUID. Please make sure you have rights to write to /var/lib/netdata/registry/netdata.public.unique.id. ``` + For a successful execution you will need to run the script with root privileges or run it with the user that is running the agent, more details on the [Connect an agent without root privileges](#connect-an-agent-without-root-privileges) section. #### bash: netdata-claim.sh: command not found @@ -435,20 +433,20 @@ installer's output should give you more error details. You may see one of the following error messages during installation: -- Failed to build libmosquitto. The install process will continue, but you will not be able to connect this node to +- Failed to build libmosquitto. The install process will continue, but you will not be able to connect this node to Netdata Cloud. -- Unable to fetch sources for libmosquitto. The install process will continue, but you will not be able to connect +- Unable to fetch sources for libmosquitto. The install process will continue, but you will not be able to connect this node to Netdata Cloud. -- Failed to build libwebsockets. The install process will continue, but you may not be able to connect this node to +- Failed to build libwebsockets. The install process will continue, but you may not be able to connect this node to Netdata Cloud. -- Unable to fetch sources for libwebsockets. The install process will continue, but you may not be able to connect +- Unable to fetch sources for libwebsockets. The install process will continue, but you may not be able to connect this node to Netdata Cloud. -- Could not find cmake, which is required to build libwebsockets. The install process will continue, but you may not +- Could not find cmake, which is required to build libwebsockets. The install process will continue, but you may not be able to connect this node to Netdata Cloud. -- Could not find cmake, which is required to build JSON-C. The install process will continue, but Netdata Cloud +- Could not find cmake, which is required to build JSON-C. The install process will continue, but Netdata Cloud support will be disabled. -- Failed to build JSON-C. Netdata Cloud support will be disabled. -- Unable to fetch sources for JSON-C. Netdata Cloud support will be disabled. +- Failed to build JSON-C. Netdata Cloud support will be disabled. +- Unable to fetch sources for JSON-C. Netdata Cloud support will be disabled. One common cause of the installer failing to build Cloud features is not having one of the following dependencies on your system: `cmake`, `json-c` and `OpenSSL`, including corresponding `devel` packages. @@ -555,6 +553,7 @@ To remove a node from you Space in Netdata Cloud, and connect it to another Spac The node should now appear online in that Space. ## Connecting reference + In the sections below, you can find reference material for the kickstart script, claiming script, connecting via the Agent's command line tool, and details about the files found in `cloud.d`. @@ -568,32 +567,6 @@ using the [ACLK](https://github.com/netdata/netdata/blob/master/aclk/README.md). | cloud base url | https://api.netdata.cloud | The URL for the Netdata Cloud web application. You should not change this. If you want to disable Cloud, change the `enabled` setting. | | enabled | yes | The runtime option to disable the [Agent-Cloud link](https://github.com/netdata/netdata/blob/master/aclk/README.md) and prevent your Agent from connecting to Netdata Cloud. | -### kickstart script - -The best way to install Netdata and connect your nodes to Netdata Cloud is with our automatic one-line installation script, [kickstart](https://github.com/netdata/netdata/blob/master/packaging/installer/README.md#automatic-one-line-installation-script). This script will install the Netdata Agent, in case it isn't already installed, and connect your node to Netdata Cloud. - -This works with: -* most Linux distributions, see [Netdata's platform support policy](https://github.com/netdata/netdata/blob/master/packaging/PLATFORM_SUPPORT.md) -* macOS - -For details on how to run this script please check [How to connect a node](#how-to-connect-a-node) and choose your environment. - -In case Netdata Agent is already installed and you run this script to connect a node to Netdata Cloud it will not upgrade your agent automatically. If you also want to upgrade the Agent installation you'll need to run the script again without the connection options. - -Our suggestion is to first run kickstart to upgrade your agent by running the command below and the run the [How to connect a node] -(#how-to-connect-a-node). - -**Linux** - -```bash -wget -O /tmp/netdata-kickstart.sh https://my-netdata.io/kickstart.sh && sh /tmp/netdata-kickstart.sh -``` - -**macOS** - -```bash -curl https://my-netdata.io/kickstart.sh > /tmp/netdata-kickstart.sh && sh /tmp/netdata-kickstart.sh --install-prefix /usr/local/ -``` ### Claiming script A Space's administrator can also connect an Agent by directly calling the `netdata-claim.sh` script either with root privileges @@ -659,5 +632,3 @@ Rooms you added that node to. The user can also put the Cloud endpoint's full certificate chain in `cloud.d/cloud_fullchain.pem` so that the Agent can trust the endpoint if necessary. - - diff --git a/collectors/apps.plugin/README.md b/collectors/apps.plugin/README.md index 8ffbb73795..ad4e0882fd 100644 --- a/collectors/apps.plugin/README.md +++ b/collectors/apps.plugin/README.md @@ -9,7 +9,8 @@ learn_rel_path: "Integrations/Monitor/System metrics" # Application monitoring (apps.plugin) -`apps.plugin` breaks down system resource usage to **processes**, **users** and **user groups**. +`apps.plugin` breaks down system resource usage to **processes**, **users** and **user groups**. +It is enabled by default on every Netdata installation. To achieve this task, it iterates through the whole process tree, collecting resource usage information for every process found running. diff --git a/collectors/charts.d.plugin/sensors/README.md b/collectors/charts.d.plugin/sensors/README.md index 5e46f45fd5..2601a2b65f 100644 --- a/collectors/charts.d.plugin/sensors/README.md +++ b/collectors/charts.d.plugin/sensors/README.md @@ -1,16 +1,7 @@ -<!-- -title: "Linux machine sensors monitoring with Netdata" -custom_edit_url: "https://github.com/netdata/netdata/edit/master/collectors/charts.d.plugin/sensors/README.md" -sidebar_label: "lm-sensors" -learn_status: "Published" -learn_topic_type: "References" -learn_rel_path: "Integrations/Monitor/Devices" ---> - # Linux machine sensors collector -Use this collector when `lm-sensors` doesn't work on your device (e.g. for RPi temperatures). -For all other cases use the [Python collector](https://github.com/netdata/netdata/blob/master/collectors/python.d.plugin/sensors), which supports multiple +Use this collector when `lm-sensors` doesn't work on your device (e.g. for RPi temperatures). +For all other cases use the [Python collector](https://github.com/netdata/netdata/blob/master/collectors/python.d.plugin/sensors), which supports multiple jobs, is more efficient and performs calculations on top of the kernel provided values. This plugin will provide charts for all configured system sensors, by reading sensors directly from the kernel. @@ -30,15 +21,23 @@ One chart for every sensor chip found and each of the above will be created. ## Enable the collector -The `sensors` collector is disabled by default. To enable it, edit the `charts.d.conf` file using `edit-config` from the -Netdata [config directory](https://github.com/netdata/netdata/blob/master/docs/configure/nodes.md), which is typically at `/etc/netdata`. +The `sensors` collector is disabled by default. + +To enable the collector, you need to edit the configuration file of `charts.d/sensors.conf`. You can do so by using the `edit config` script. + +> ### Info +> +> To edit configuration files in a safe way, we provide the [`edit config` script](https://github.com/netdata/netdata/blob/master/docs/configure/nodes.md#use-edit-config-to-edit-configuration-files) located in your [Netdata config directory](https://github.com/netdata/netdata/blob/master/docs/configure/nodes.md#the-netdata-config-directory) (typically is `/etc/netdata`) that creates the proper file and opens it in an editor automatically. +> It is recommended to use this way for configuring Netdata. +> +> Please also note that after most configuration changes you will need to [restart the Agent](https://github.com/netdata/netdata/blob/master/docs/configure/start-stop-restart.md) for the changes to take effect. ```bash cd /etc/netdata # Replace this path with your Netdata config directory, if different sudo ./edit-config charts.d.conf ``` -It also needs to be set to "force" to be enabled: +You need to uncomment the regarding `sensors`, and set the value to `force`. ```shell # example=force @@ -47,8 +46,7 @@ sensors=force ## Configuration -Edit the `charts.d/sensors.conf` configuration file using `edit-config` from the -Netdata [config directory](https://github.com/netdata/netdata/blob/master/docs/configure/nodes.md), which is typically at `/etc/netdata`. +Edit the `charts.d/sensors.conf` configuration file using `edit-config`: ```bash cd /etc/netdata # Replace this path with your Netdata config directory, if different @@ -79,5 +77,3 @@ sensors_excluded=() ``` --- - - diff --git a/collectors/diskspace.plugin/README.md b/collectors/diskspace.plugin/README.md index cf1273ac54..b70bbf0085 100644 --- a/collectors/diskspace.plugin/README.md +++ b/collectors/diskspace.plugin/README.md @@ -1,29 +1,37 @@ -<!-- -title: "Monitor disk (diskspace.plugin)" -description: "Monitor the disk usage space of mounted disks in real-time with the Netdata Agent, plus preconfigured alarms for disks at risk of filling up." -custom_edit_url: "https://github.com/netdata/netdata/edit/master/collectors/diskspace.plugin/README.md" -sidebar_label: "Disks" -learn_status: "Published" -learn_topic_type: "References" -learn_rel_path: "Integrations/Monitor/System metrics" ---> - # Monitor disk (diskspace.plugin) This plugin monitors the disk space usage of mounted disks, under Linux. The plugin requires Netdata to have execute/search permissions on the mount point itself, as well as each component of the absolute path to the mount point. Two charts are available for every mount: -- Disk Space Usage -- Disk Files (inodes) Usage +- Disk Space Usage +- Disk Files (inodes) Usage ## configuration Simple patterns can be used to exclude mounts from showed statistics based on path or filesystem. By default read-only mounts are not displayed. To display them `yes` should be set for a chart instead of `auto`. -By default, Netdata will enable monitoring metrics only when they are not zero. If they are constantly zero they are ignored. Metrics that will start having values, after Netdata is started, will be detected and charts will be automatically added to the dashboard (a refresh of the dashboard is needed for them to appear though). Set `yes` for a chart instead of `auto` to enable it permanently. You can also set the `enable zero metrics` option to `yes` in the `[global]` section which enables charts with zero metrics for all internal Netdata plugins. +By default, Netdata will enable monitoring metrics only when they are not zero. If they are constantly zero they are ignored. Metrics that will start having values, after Netdata is started, will be detected and charts will be automatically added to the dashboard (a refresh of the dashboard is needed for them to appear though). + +To configure this plugin, you need to edit the configuration file `netdata.conf`. You can do so by using the `edit config` script. + +> ### Info +> +> To edit configuration files in a safe way, we provide the [`edit config` script](https://github.com/netdata/netdata/blob/master/docs/configure/nodes.md#use-edit-config-to-edit-configuration-files) located in your [Netdata config directory](https://github.com/netdata/netdata/blob/master/docs/configure/nodes.md#the-netdata-config-directory) (typically is `/etc/netdata`) that creates the proper file and opens it in an editor automatically. +> It is recommended to use this way for configuring Netdata. +> +> Please also note that after most configuration changes you will need to [restart the Agent](https://github.com/netdata/netdata/blob/master/docs/configure/start-stop-restart.md) for the changes to take effect. +```bash +cd /etc/netdata # Replace this path with your Netdata config directory, if different +sudo ./edit-config netdata.conf ``` + +You can enable the effect of each line by uncommenting it. + +You can set `yes` for a chart instead of `auto` to enable it permanently. You can also set the `enable zero metrics` option to `yes` in the `[global]` section which enables charts with zero metrics for all internal Netdata plugins. + +```conf [plugin:proc:diskspace] # remove charts of unmounted disks = yes # update every = 1 @@ -34,14 +42,12 @@ By default, Netdata will enable monitoring metrics only when they are not zero. # inodes usage for all disks = auto ``` -Charts can be enabled/disabled for every mount separately: +Charts can be enabled/disabled for every mount separately, just look for the name of the mount after `[plugin:proc:diskspace:`. -``` +```conf [plugin:proc:diskspace:/] # space usage = auto # inodes usage = auto ``` > for disks performance monitoring, see the `proc` plugin, [here](https://github.com/netdata/netdata/blob/master/collectors/proc.plugin/README.md#monitoring-disks) - - diff --git a/docs/cloud/manage/invite-your-team.md b/docs/cloud/manage/invite-your-team.md index d515c1efd1..ebe0b8df51 100644 --- a/docs/cloud/manage/invite-your-team.md +++ b/docs/cloud/manage/invite-your-team.md @@ -3,25 +3,20 @@ Invite new users to your Space by clicking on **Invite Users** in the [Space](https://github.com/netdata/netdata/blob/master/docs/cloud/spaces.md) management area. -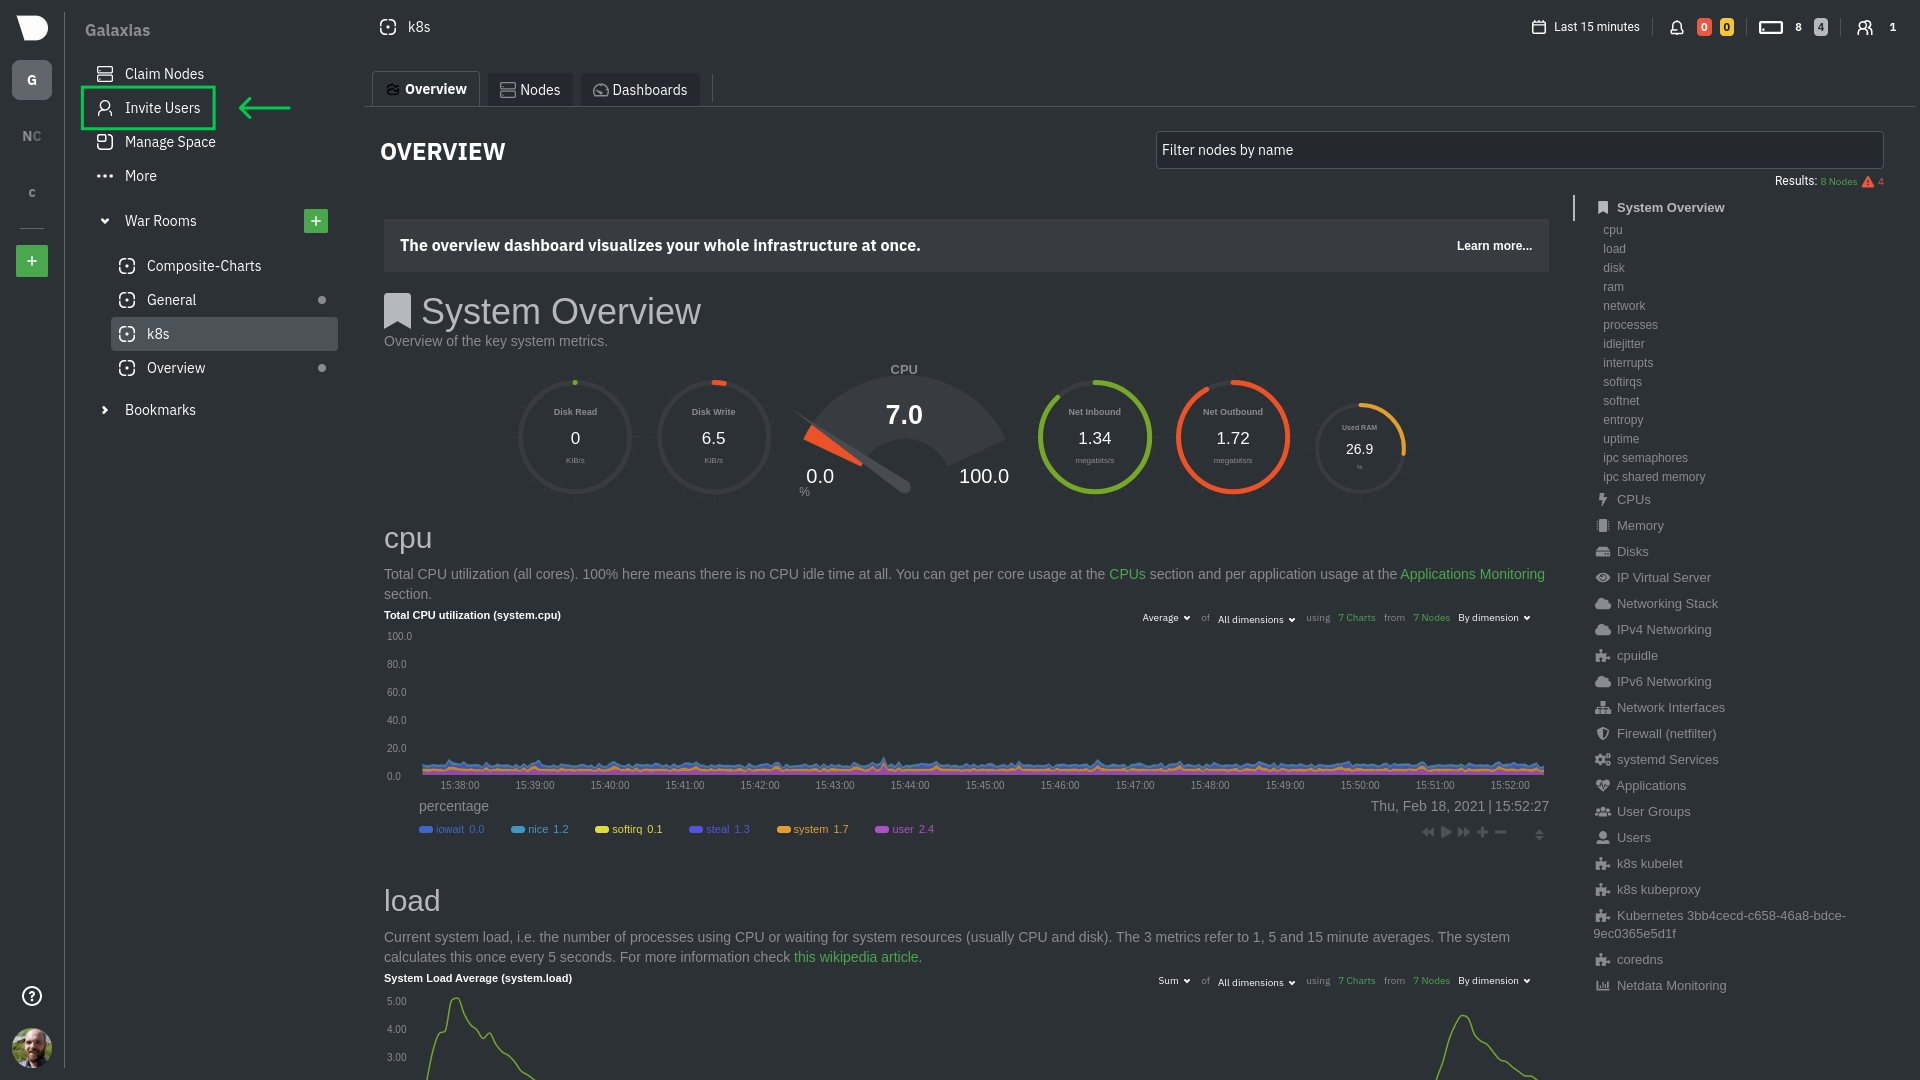 +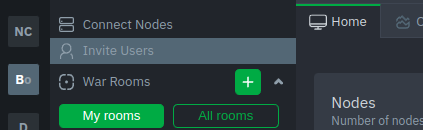 -Enter the email addresses for the users you want to invite to your Space. You can enter any number of email addresses, -separated by a comma, to send multiple invitations at once. + +You will be prompted to enter the email addresses for the users you want to invite to your Space. You can enter any number of email addresses, separated by a comma, to send multiple invitations at once. Next, choose the War Rooms you want to invite these users to. Once logged in, these users are not restricted only to these War Rooms. They can be invited to others, or join any that are public. +Next, pick a role for the invited user. You can read more about [which roles are available](https://github.com/netdata/netdata/blob/master/docs/cloud/manage/role-based-access.md#what-roles-are-available) based on your [subscription plan](https://github.com/netdata/netdata/blob/master/docs/cloud/manage/plans.md). + Click the **Send** button to send an email invitation, which will prompt them to [sign up](https://github.com/netdata/netdata/blob/master/docs/cloud/manage/sign-in.md) and join your Space. - + Any unaccepted invitations remain under **Invitations awaiting response**. These invitations can be rescinded at any time by clicking the trash can icon. - -## What's next? - -If your team members have trouble signing in, direct them to -the [sign in guide](https://github.com/netdata/netdata/blob/master/docs/cloud/manage/sign-in.md). Once your -team is onboarded to Netdata Cloud, they can view shared assets, such -as [new dashboards](https://github.com/netdata/netdata/blob/master/docs/cloud/visualize/dashboards.md). diff --git a/packaging/installer/methods/ansible.md b/packaging/installer/methods/ansible.md index aebe17da4e..6b4c69f09f 100644 --- a/packaging/installer/methods/ansible.md +++ b/packaging/installer/methods/ansible.md @@ -50,7 +50,7 @@ minutes. ## Download and configure the playbook First, download the -[playbook](https://github.com/netdata/community/tree/main/netdata-agent-deployment/ansible-quickstart), move it to the +[playbook](https://github.com/netdata/community/tree/main/configuration-management/ansible-quickstart/), move it to the current directory, and remove the rest of the cloned repository, as it's not required for using the Ansible playbook. ```bash |