Advanced fzf examples
======================
*(Last update: 2021/05/22)*
* [Introduction](#introduction)
* [Screen Layout](#screen-layout)
* [`--height`](#--height)
* [`fzf-tmux`](#fzf-tmux)
* [Popup window support](#popup-window-support)
* [Dynamic reloading of the list](#dynamic-reloading-of-the-list)
* [Updating the list of processes by pressing CTRL-R](#updating-the-list-of-processes-by-pressing-ctrl-r)
* [Toggling between data sources](#toggling-between-data-sources)
* [Ripgrep integration](#ripgrep-integration)
* [Using fzf as the secondary filter](#using-fzf-as-the-secondary-filter)
* [Using fzf as interative Ripgrep launcher](#using-fzf-as-interative-ripgrep-launcher)
* [Switching to fzf-only search mode](#switching-to-fzf-only-search-mode)
* [Log tailing](#log-tailing)
* [Key bindings for git objects](#key-bindings-for-git-objects)
* [Files listed in `git status`](#files-listed-in-git-status)
* [Branches](#branches)
* [Commit hashes](#commit-hashes)
* [Color themes](#color-themes)
* [Generating fzf color theme from Vim color schemes](#generating-fzf-color-theme-from-vim-color-schemes)
Introduction
------------
fzf is an interactive [Unix filter][filter] program that is designed to be
used with other Unix tools. It reads a list of items from the standard input,
allows you to select a subset of the items, and prints the selected ones to
the standard output. You can think of it as an interactive version of *grep*,
and it's already useful even if you don't know any of its options.
```sh
# 1. ps: Feed the list of processes to fzf
# 2. fzf: Interactively select a process using fuzzy matching algorithm
# 3. awk: Take the PID from the selected line
# 3. kill: Kill the process with the PID
ps -ef | fzf | awk '{print $2}' | xargs kill -9
```
[filter]: https://en.wikipedia.org/wiki/Filter_(software)
While the above example succinctly summarizes the fundamental concept of fzf,
you can build much more sophisticated interactive workflows using fzf once you
learn its wide variety of features.
- To see the full list of options and features, see `man fzf`
- To see the latest additions, see [CHANGELOG.md](CHANGELOG.md)
This document will guide you through some examples that will familiarize you
with the advanced features of fzf.
Screen Layout
-------------
### `--height`
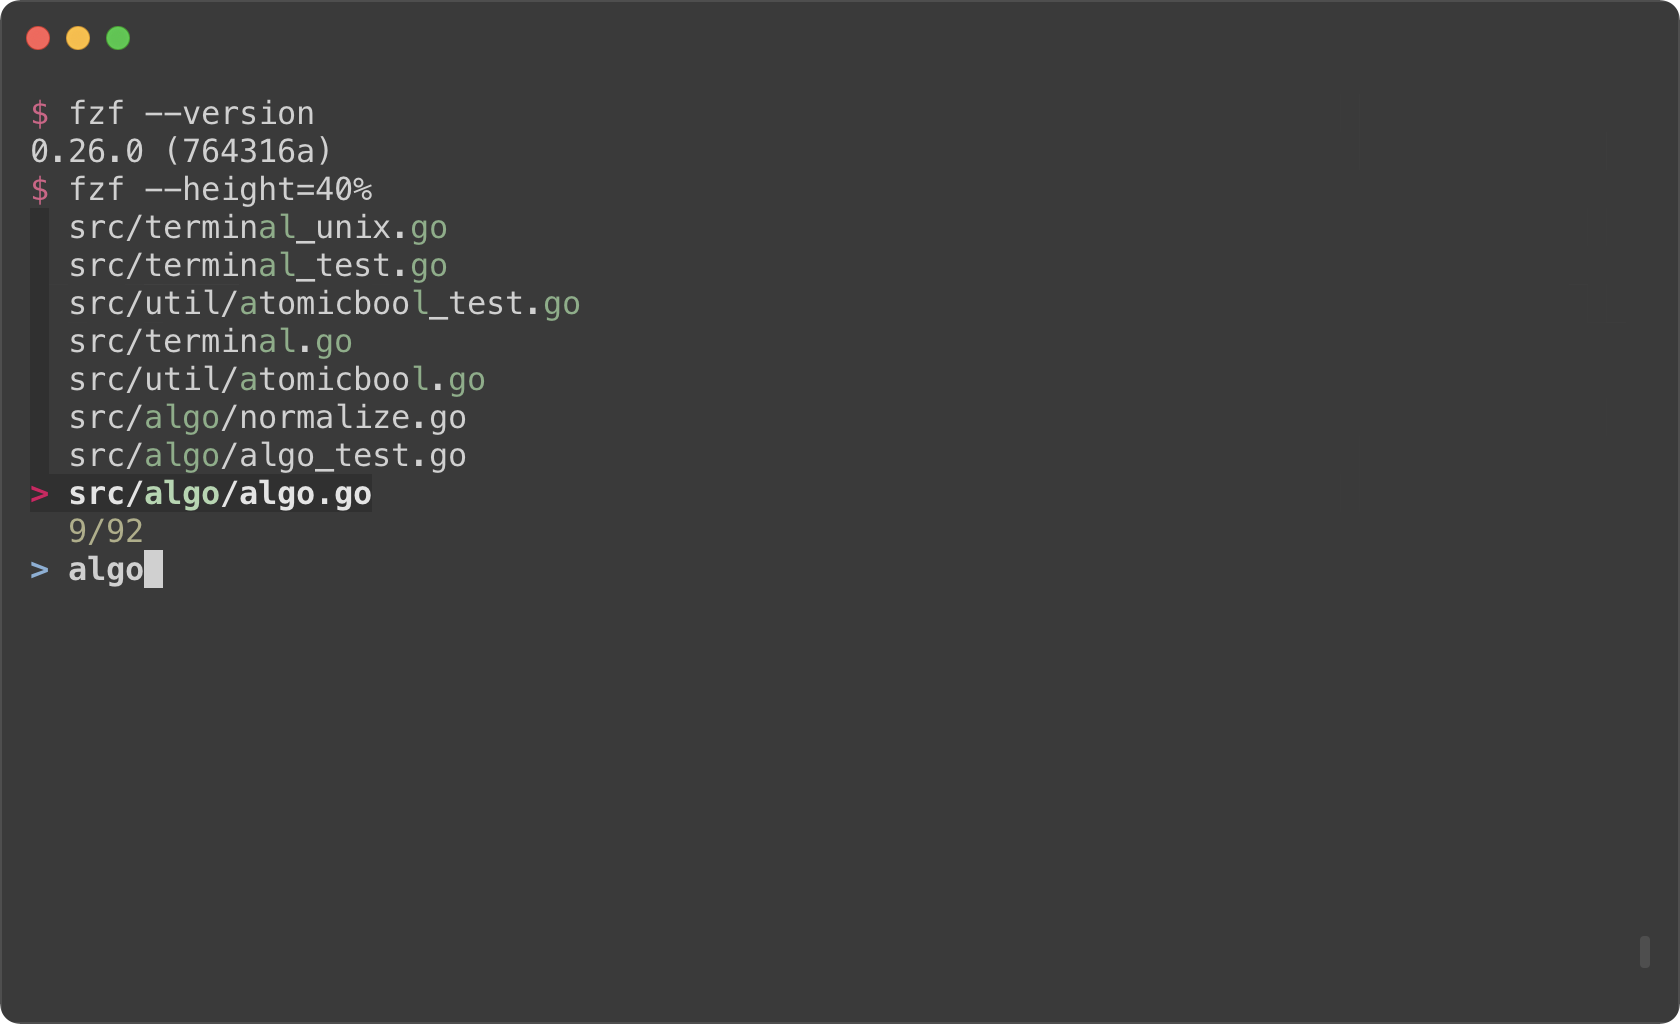
fzf by default opens in fullscreen mode, but it's not always desirable.
Oftentimes, you want to see the current context of the terminal while using
fzf. `--height` is an option for opening fzf below the cursor in
non-fullscreen mode so you can still see the previous commands and their
results above it.
```sh
fzf --height=40%
```
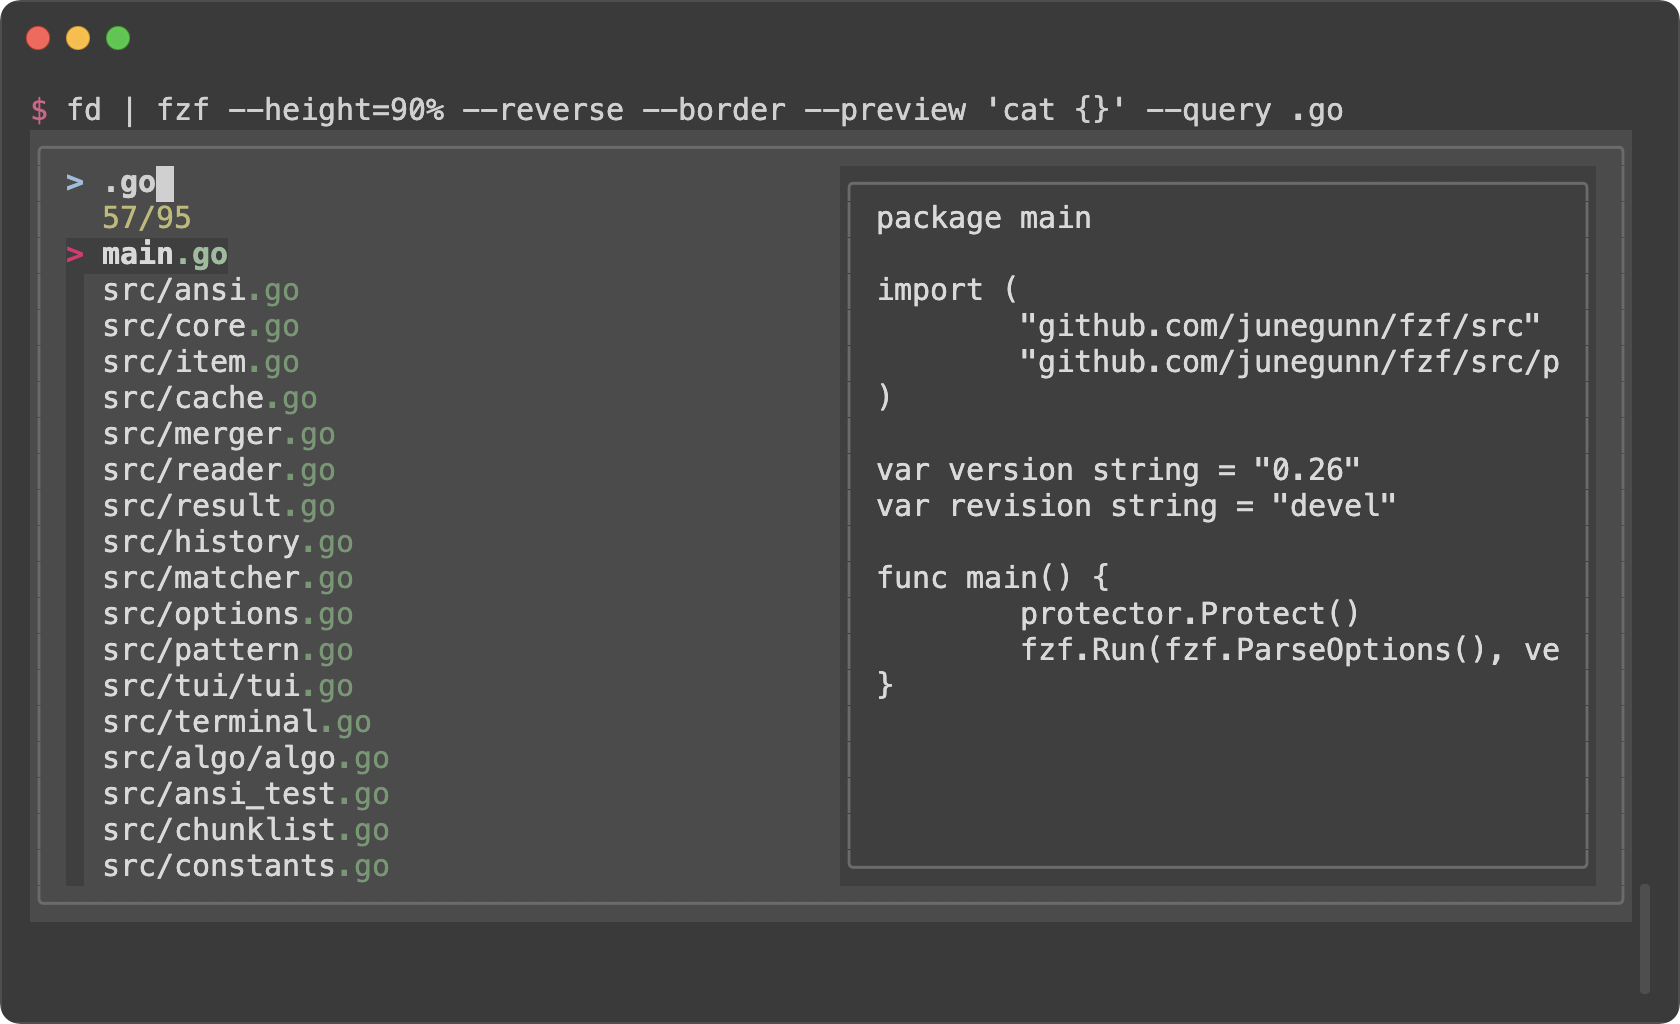
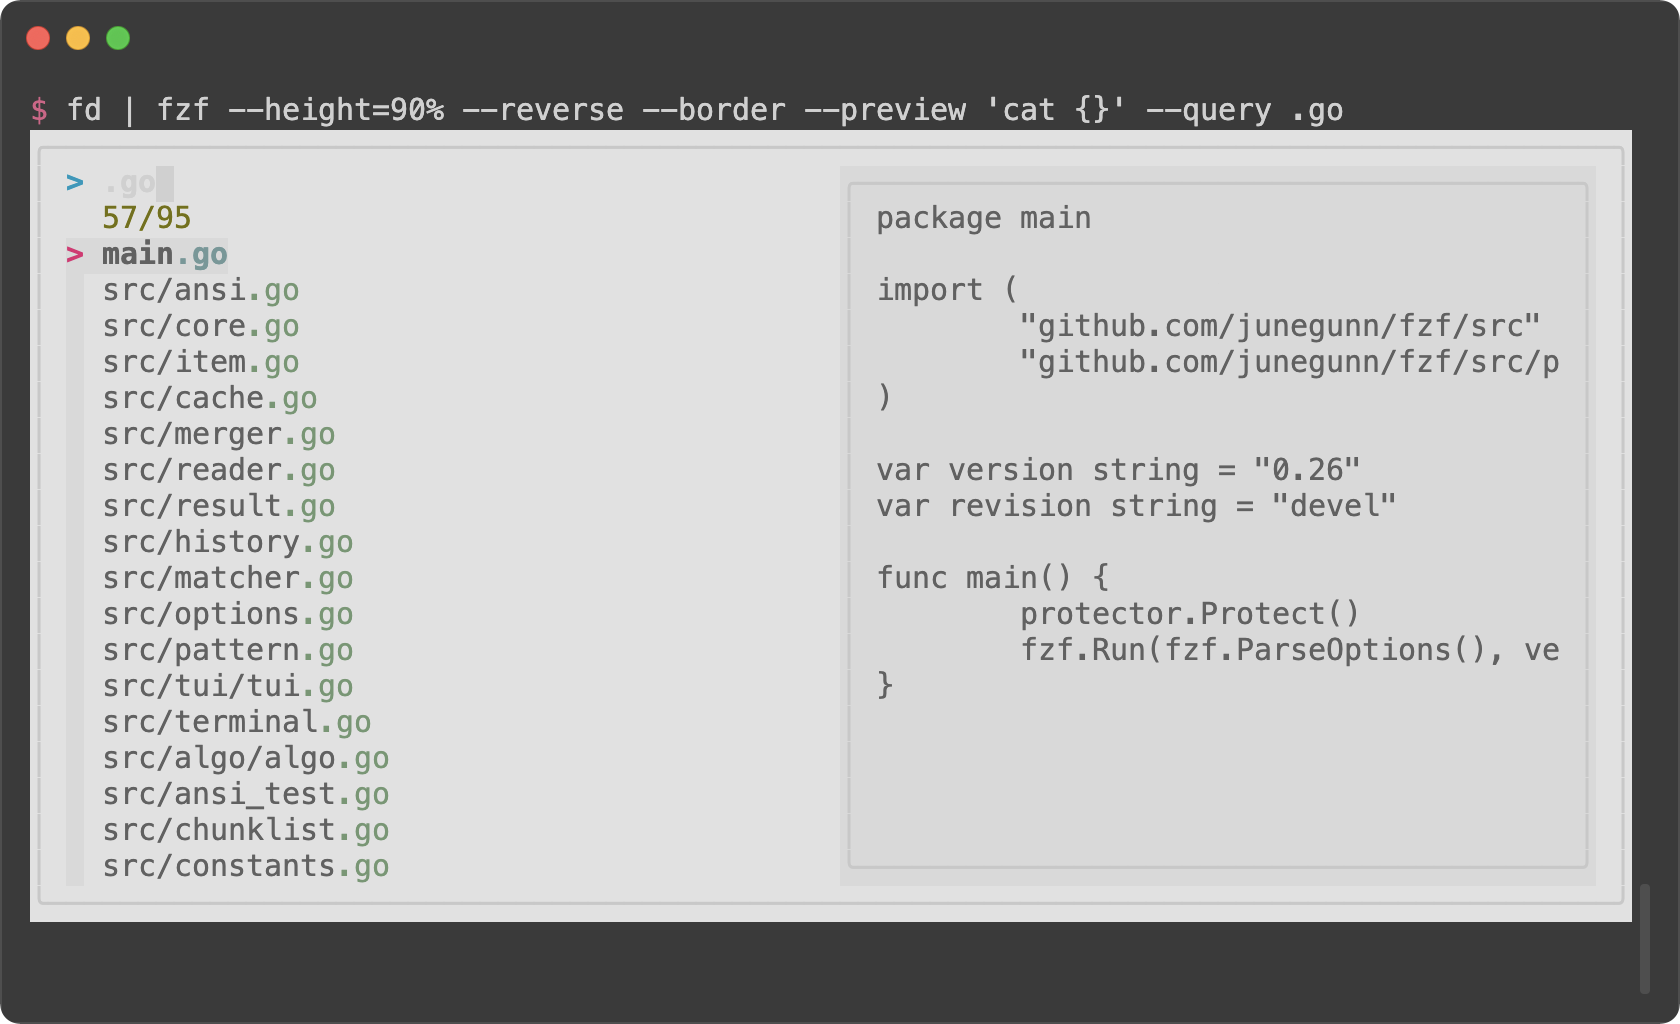
You might also want to experiment with other layout options such as
`--layout=reverse`, `--info=inline`, `--border`, `--margin`, etc.
```sh
fzf --height=40% --layout=reverse
fzf --height=40% --layout=reverse --info=inline
fzf --height=40% --layout=reverse --info=inline --border
fzf --height=40% --layout=reverse --info=inline --border --margin=1
fzf --height=40% --layout=reverse --info=inline --border --margin=1 --padding=1
```
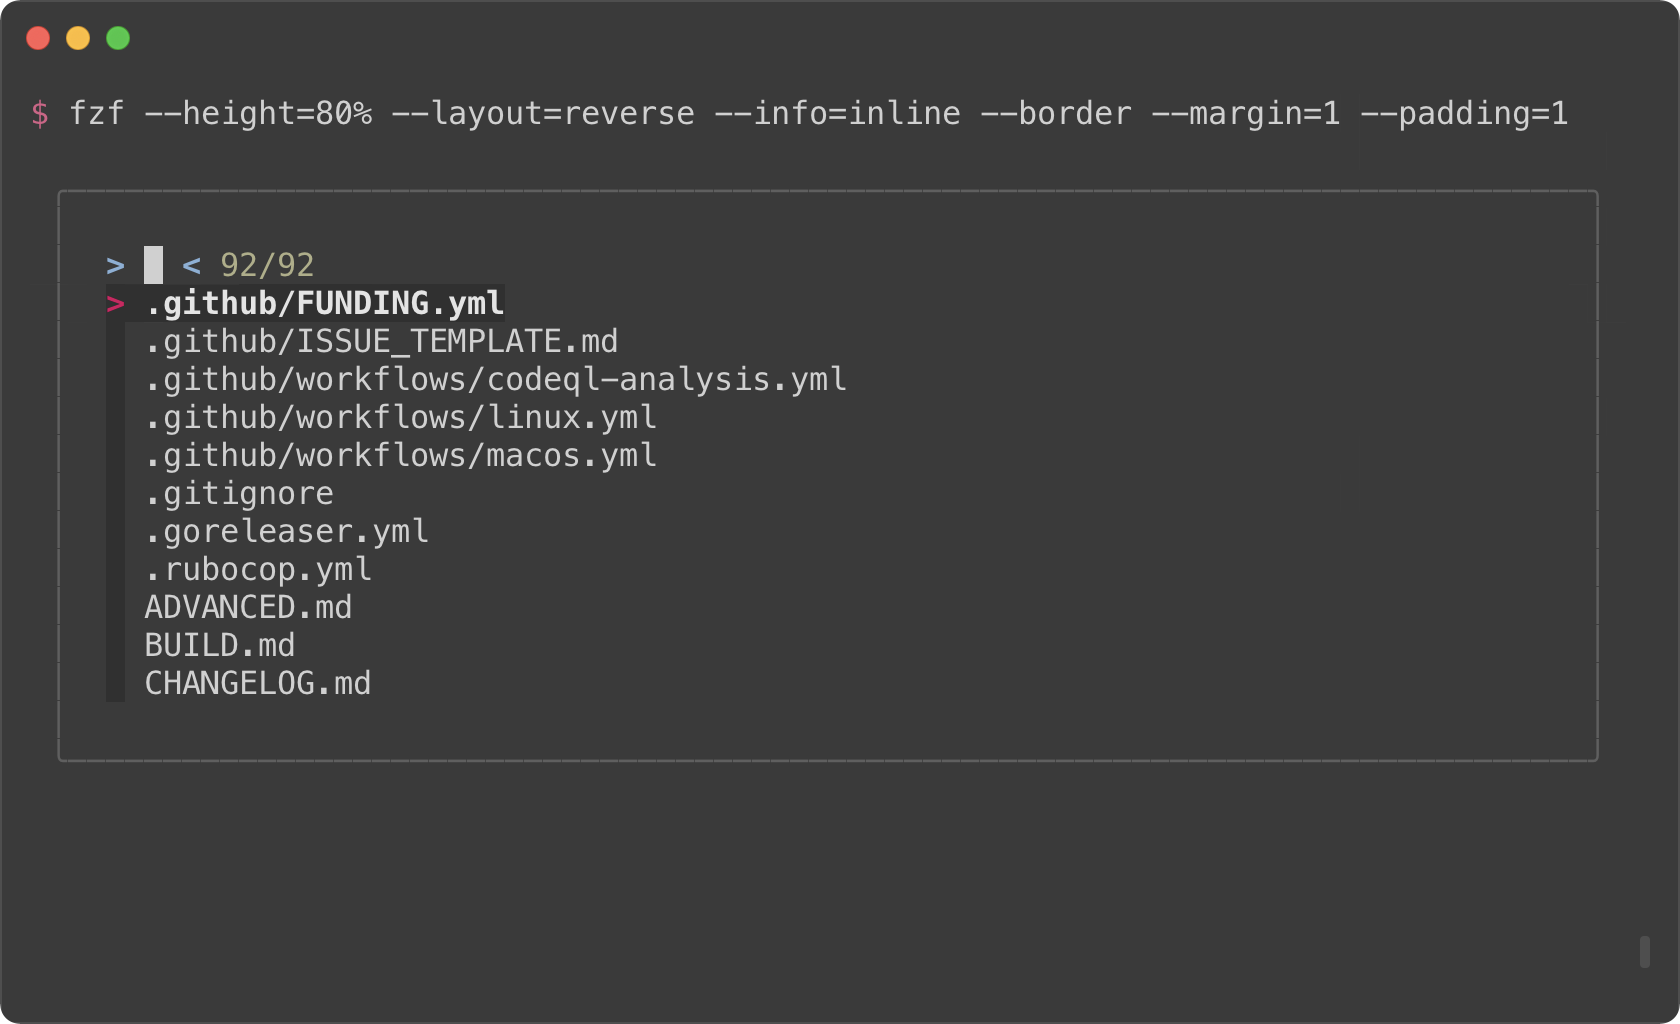
*(See `Layout` section of the man page to see the full list of options)*
But you definitely don't want to repeat `--height=40% --layout=reverse
--info=inline --border --margin=1 --padding=1` every time you use fzf. You
could write a wrapper script or shell alias, but there is an easier option.
Define `$FZF_DEFAULT_OPTS` like so:
```sh
export FZF_DEFAULT_OPTS="--height=40% --layout=reverse --info=inline --border --margin=1 --padding=1"
```
### `fzf-tmux`
Before fzf had `--height` option, we would open fzf in a tmux split pane not
to take up the whole screen. This is done using `fzf-tmux` script.
```sh
# Open fzf on a tmux split pane below the current pane.
# Takes the same set of options.
fzf-tmux --layout=reverse
```

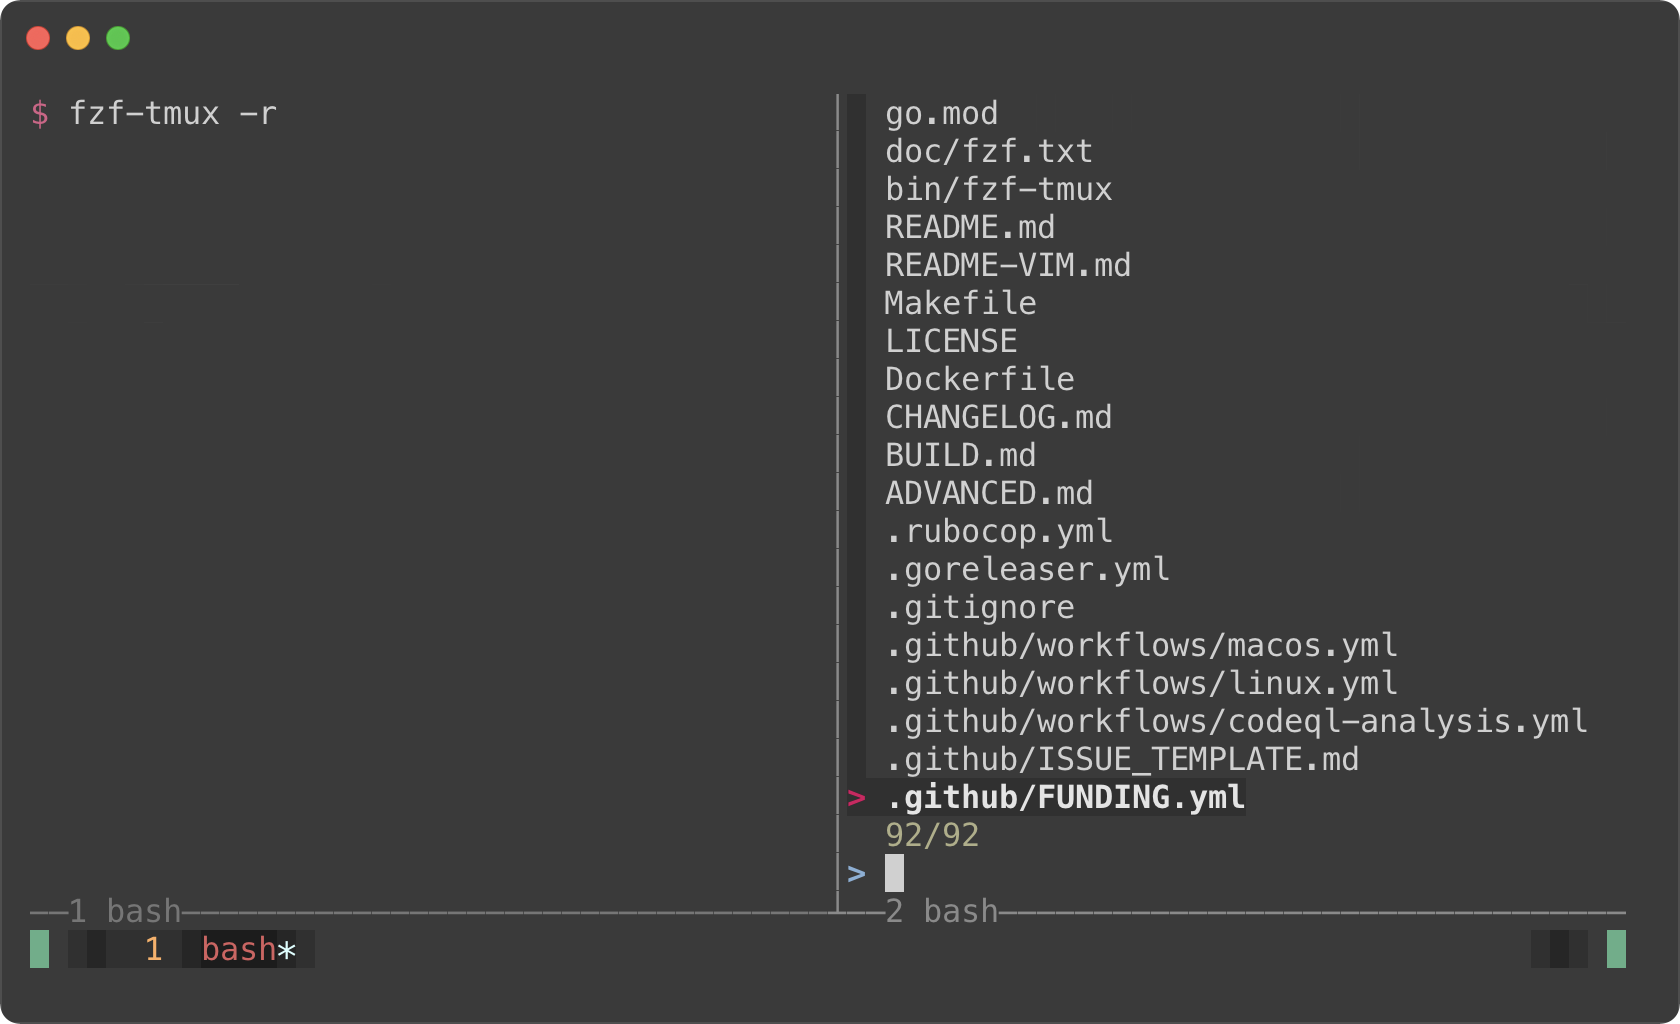
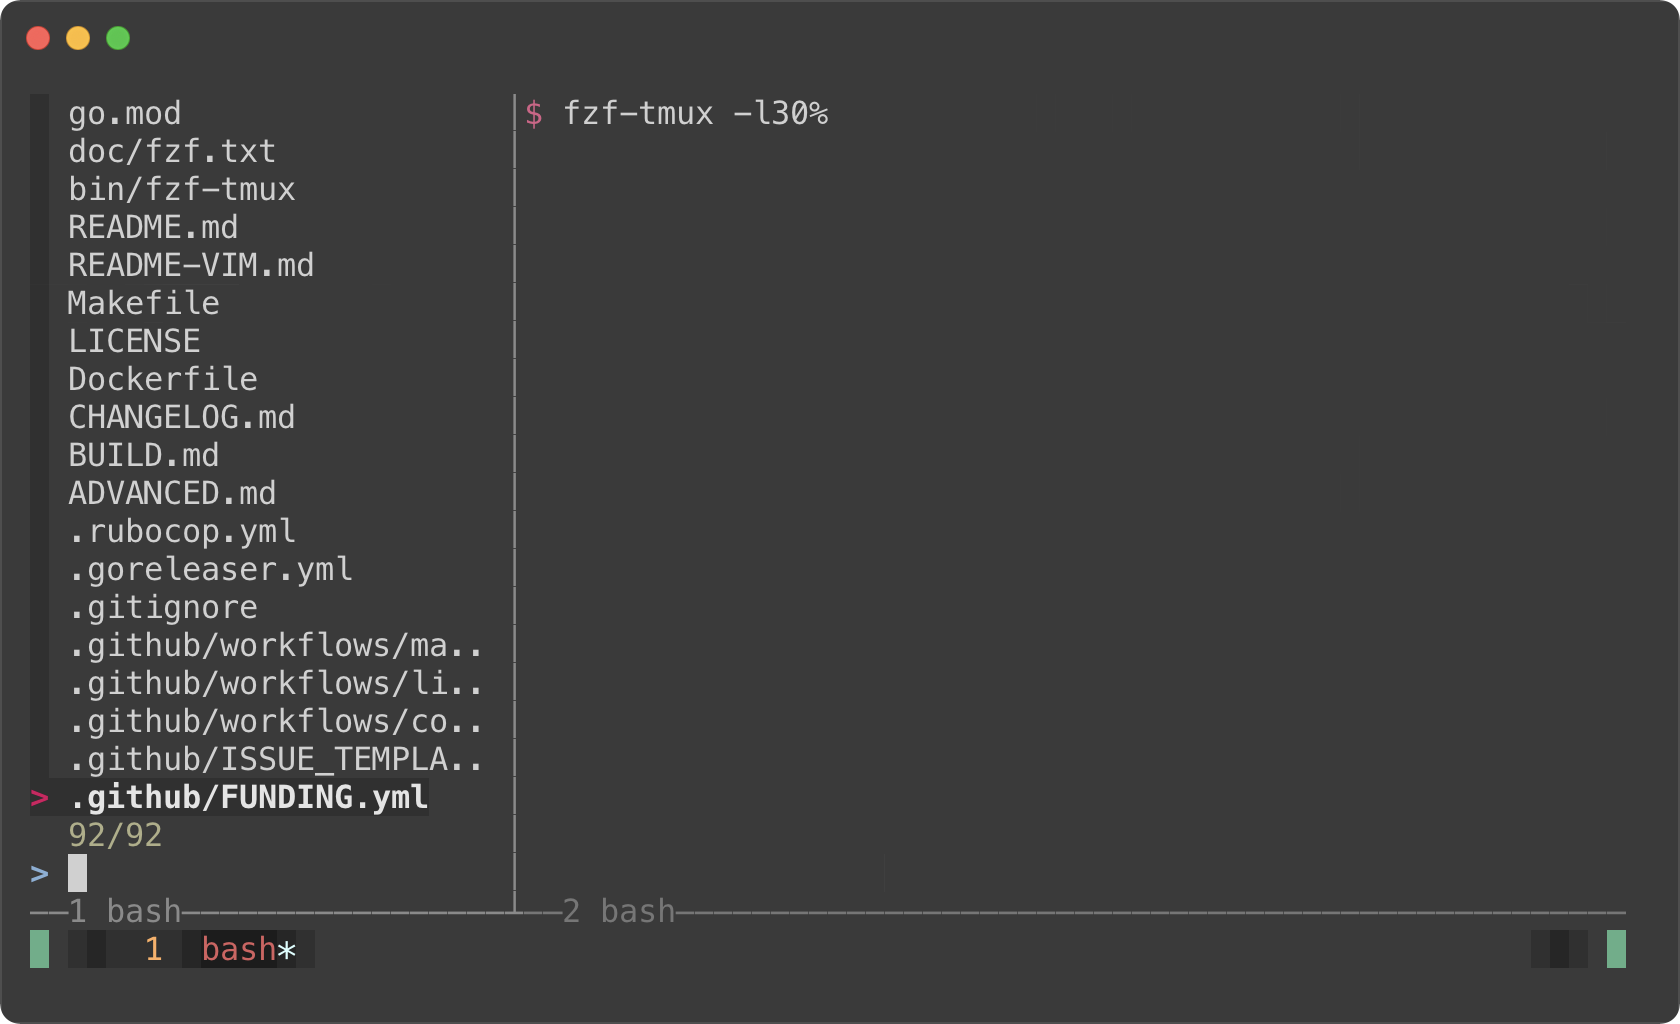
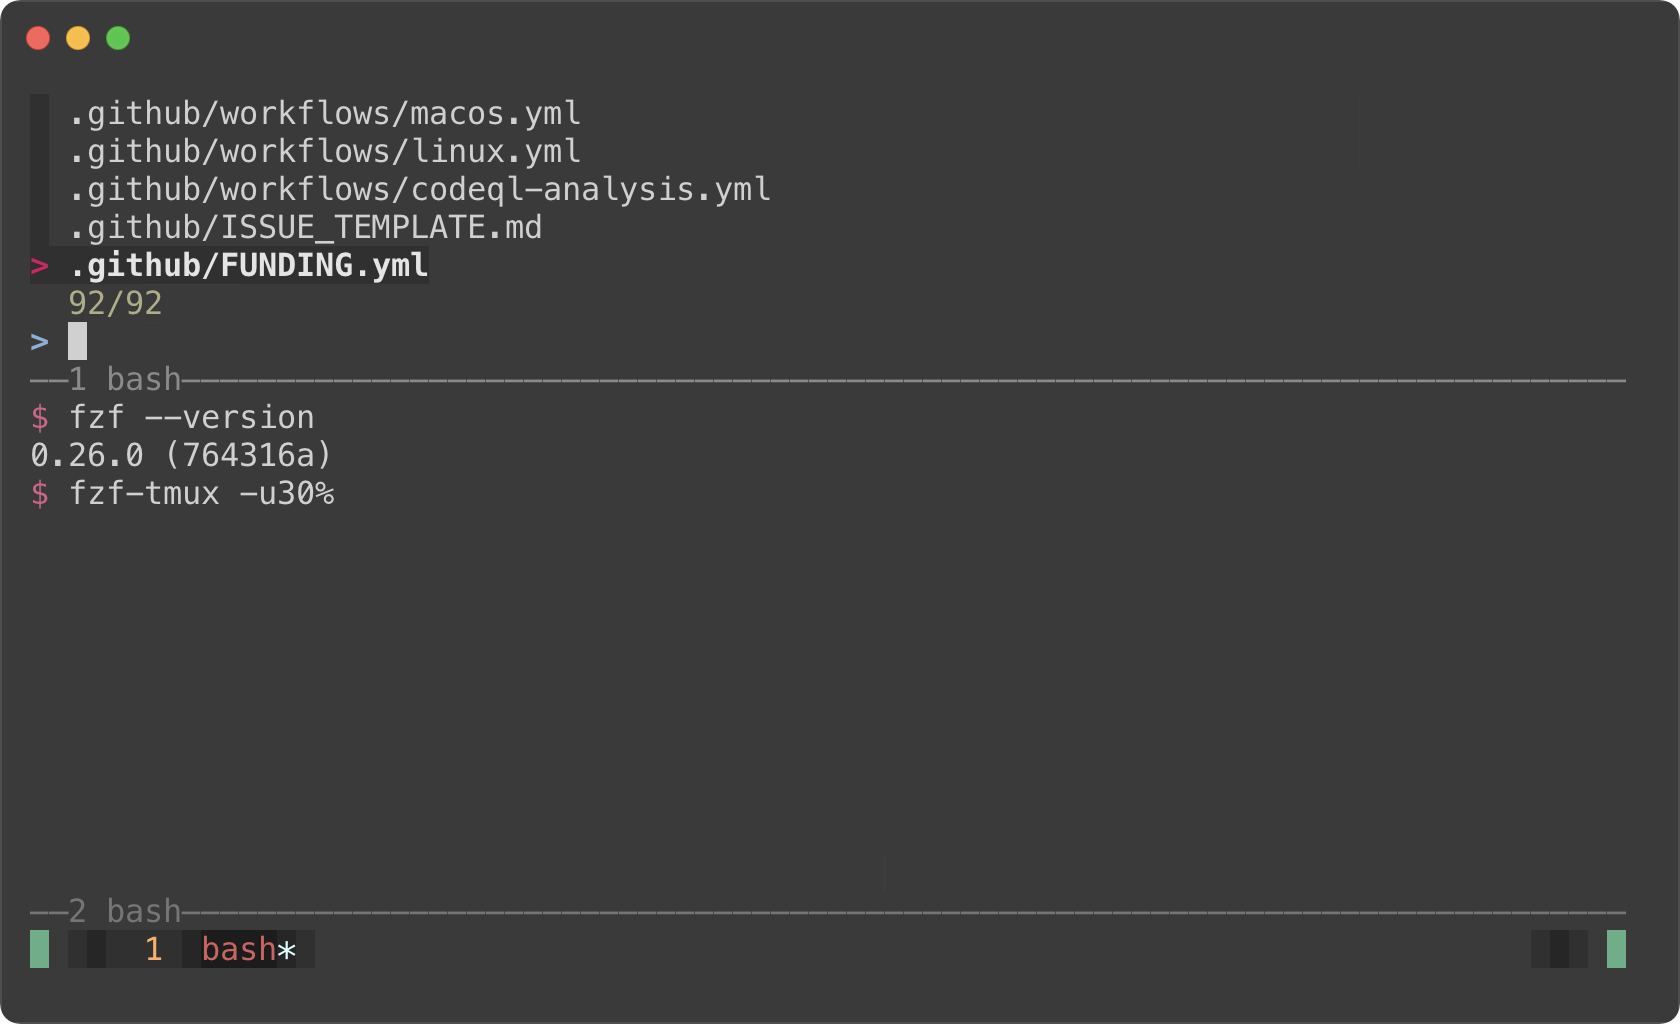
The limitation of `fzf-tmux` is that it only works when you're on tmux unlike
`--height` option. But the advantage of it is that it's more flexible.
(See `man fzf-tmux` for available options.)
```sh
# On the right (50%)
fzf-tmux -r
# On the left (30%)
fzf-tmux -l30%
# Above the cursor
fzf-tmux -u30%
```
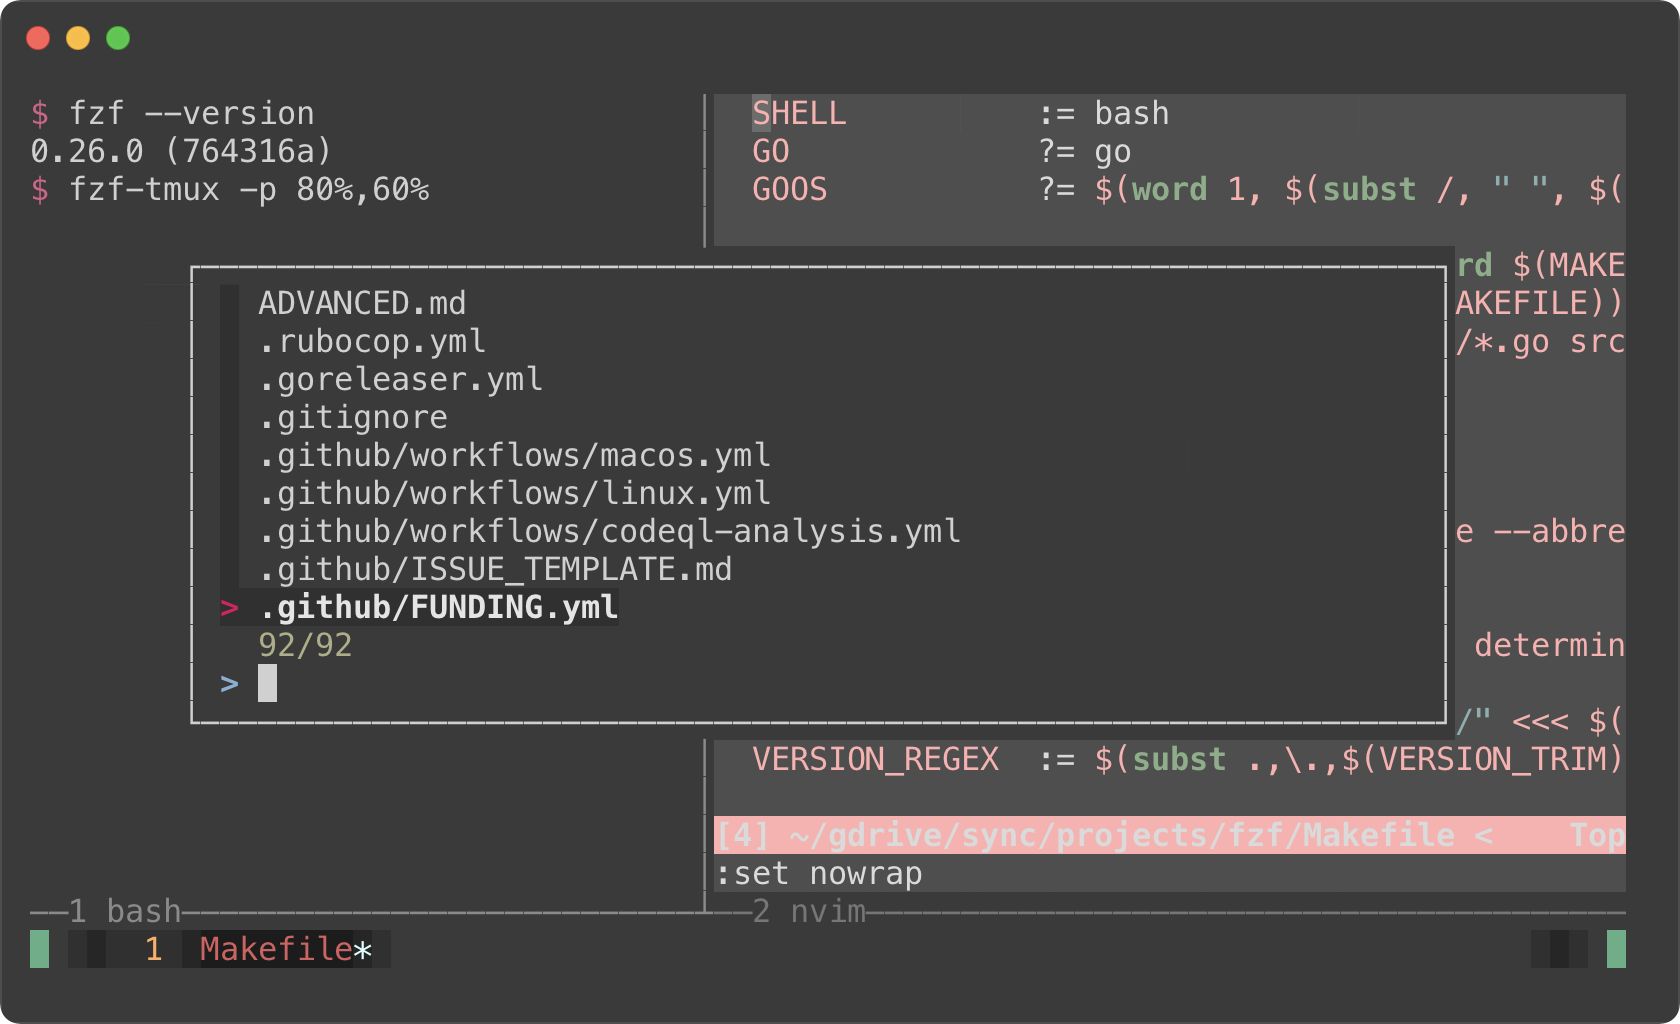
#### Popup window support
But here's the really cool part; tmux 3.2 added support for popup windows. So
you can open fzf in a popup window, which is quite useful if you frequently
use split panes.
```sh
# Open tmux in a tmux popup window (default size: 50% of the screen)
fzf-tmux -p
# 80% width, 60% height
fzf-tmux -p 80%,60%
```
> You might also want to check out my tmux plugins which support this popup
> window layout.
>
> - https://github.com/junegunn/tmux-fzf-url
> - https://github.com/junegunn/tmux-fzf-maccy
Dynamic reloading of the list
-----------------------------
fzf can dynamically update the candidate list using an arbitrary program with
`reload` bindings (The design document for `reload` can be found
[here][reload]).
[reload]: https://github.com/junegunn/fzf/issues/1750
### Updating the list of processes by pressing CTRL-R
This example shows how you can set up a binding for dynamically updating the
list without restarting fzf.
```sh
(date; ps -ef) |
fzf --bind='ctrl-r:reload(date; ps -ef)' \
--header=$'Press CTRL-R to reload\n\n' --header-lines=2 \
--preview='echo {}' --preview-window=down,3,wrap \
--layout=reverse --height=80% | awk '{print $2}' | xargs kill -9
```
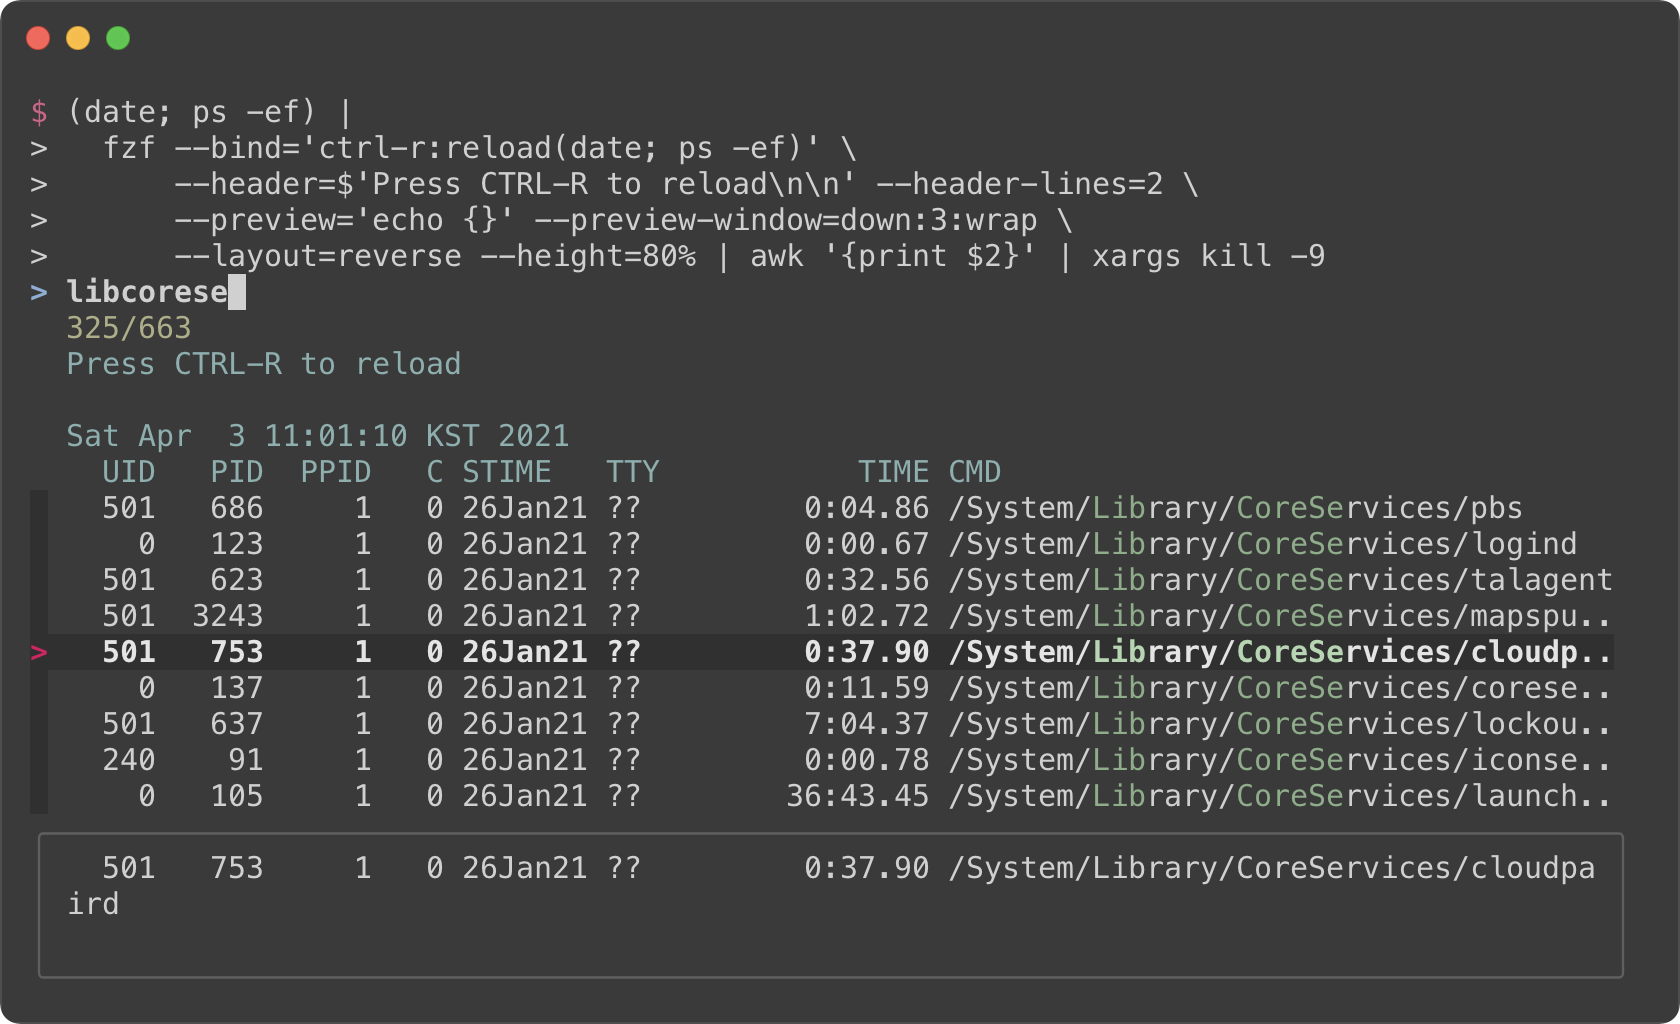
- The initial command is `(date; ps -ef)`. It prints the current date and
time, and the list of the processes.
- With `--header` option, you can show any message as the fixed header.
- To disallow selecting the first two lines (`date` and `ps` header), we use
`--header-lines=2` option.
- `--bind='ctrl-r:reload(date; ps -ef)'` binds CTRL-R to `reload` action that
runs `date; ps -ef`, so we can update the list of the processes by pressing
CTRL-R.
- We use simple `echo {}` preview option, so we can see the entire line on the
preview window below even if it's too long
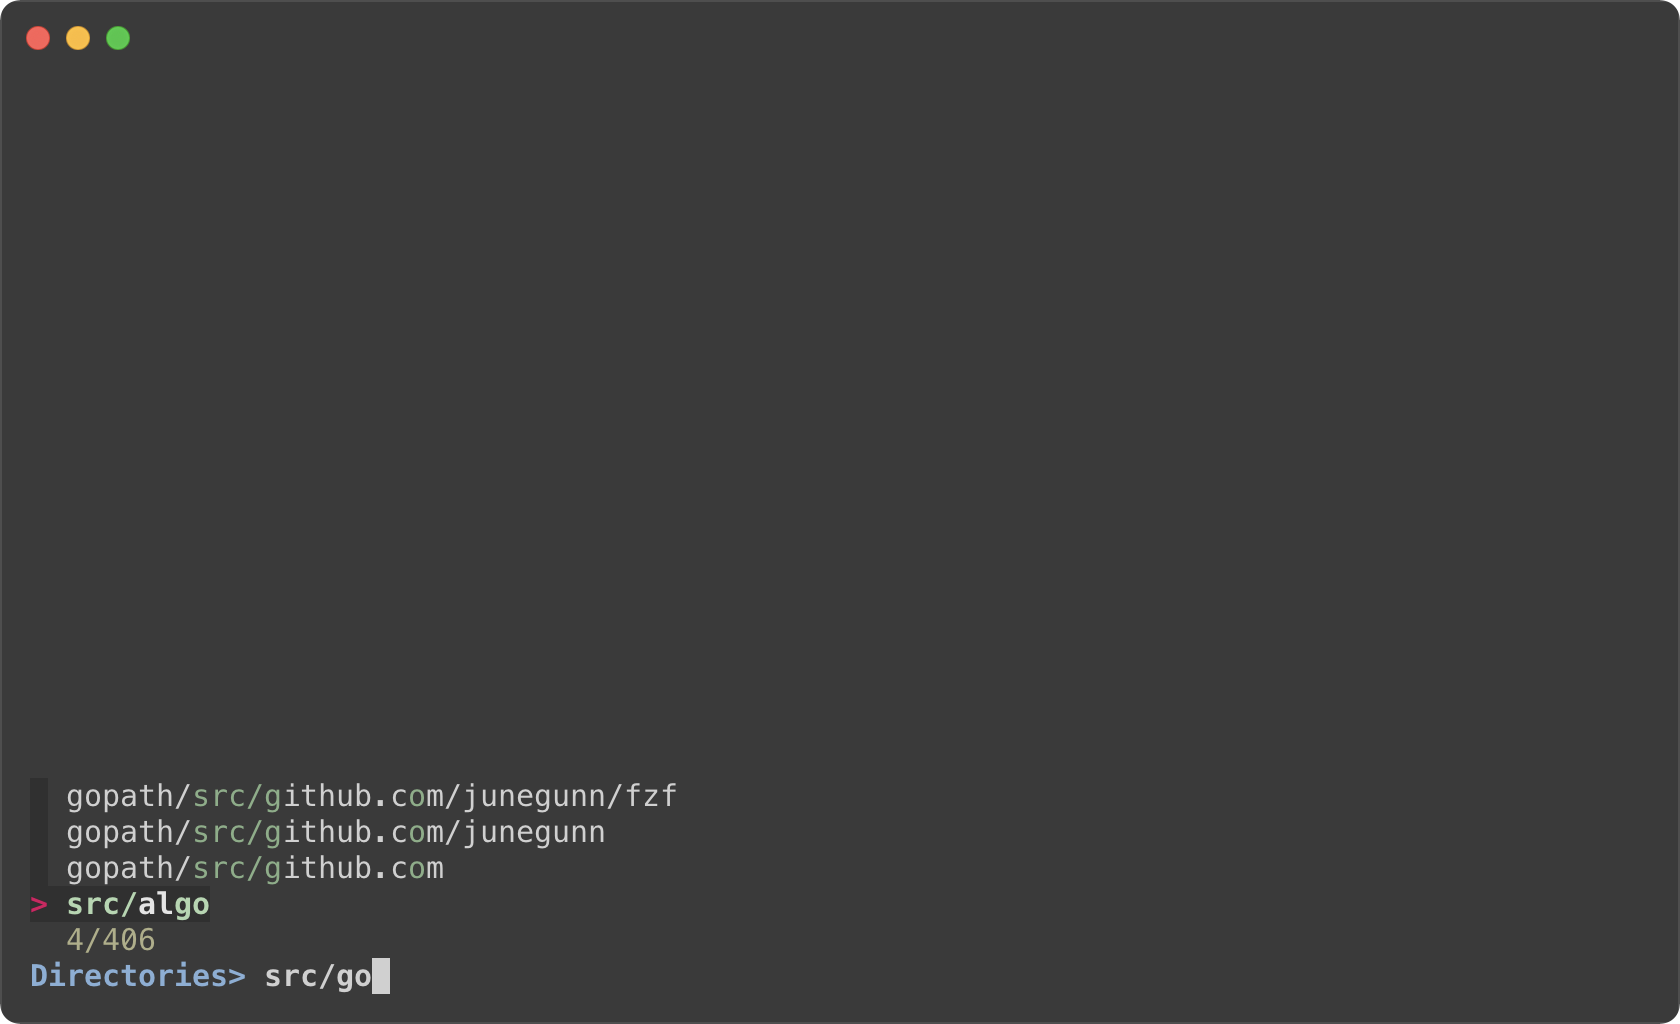
### Toggling between data sources
You're not limiited to just one reload binding. Set up multiple bindings so
you can switch between data sources.
```sh
find * | fzf --prompt 'All> ' \
--header 'CTRL-D: Directories / CTRL-F: Files' \
--bind 'ctrl-d:change-prompt(Directories> )+reload(find * -type d)' \
--bind 'ctrl-f:change-prompt(Files> )+reload(find * -type f)'
```

Ripgrep integration
-------------------
### Using fzf as the secondary filter
* Requires [bat][bat]
* Requires [Ripgrep][rg]
[bat]: https://github.com/sharkdp/bat
[rg]: https://github.com/BurntSushi/ripgrep
fzf is pretty fast for filtering a list that you will rarely have to think
about its performance. But it is not the right tool for searching for text
inside many large files, and in that case you should definitely use something
like [Ripgrep][rg].
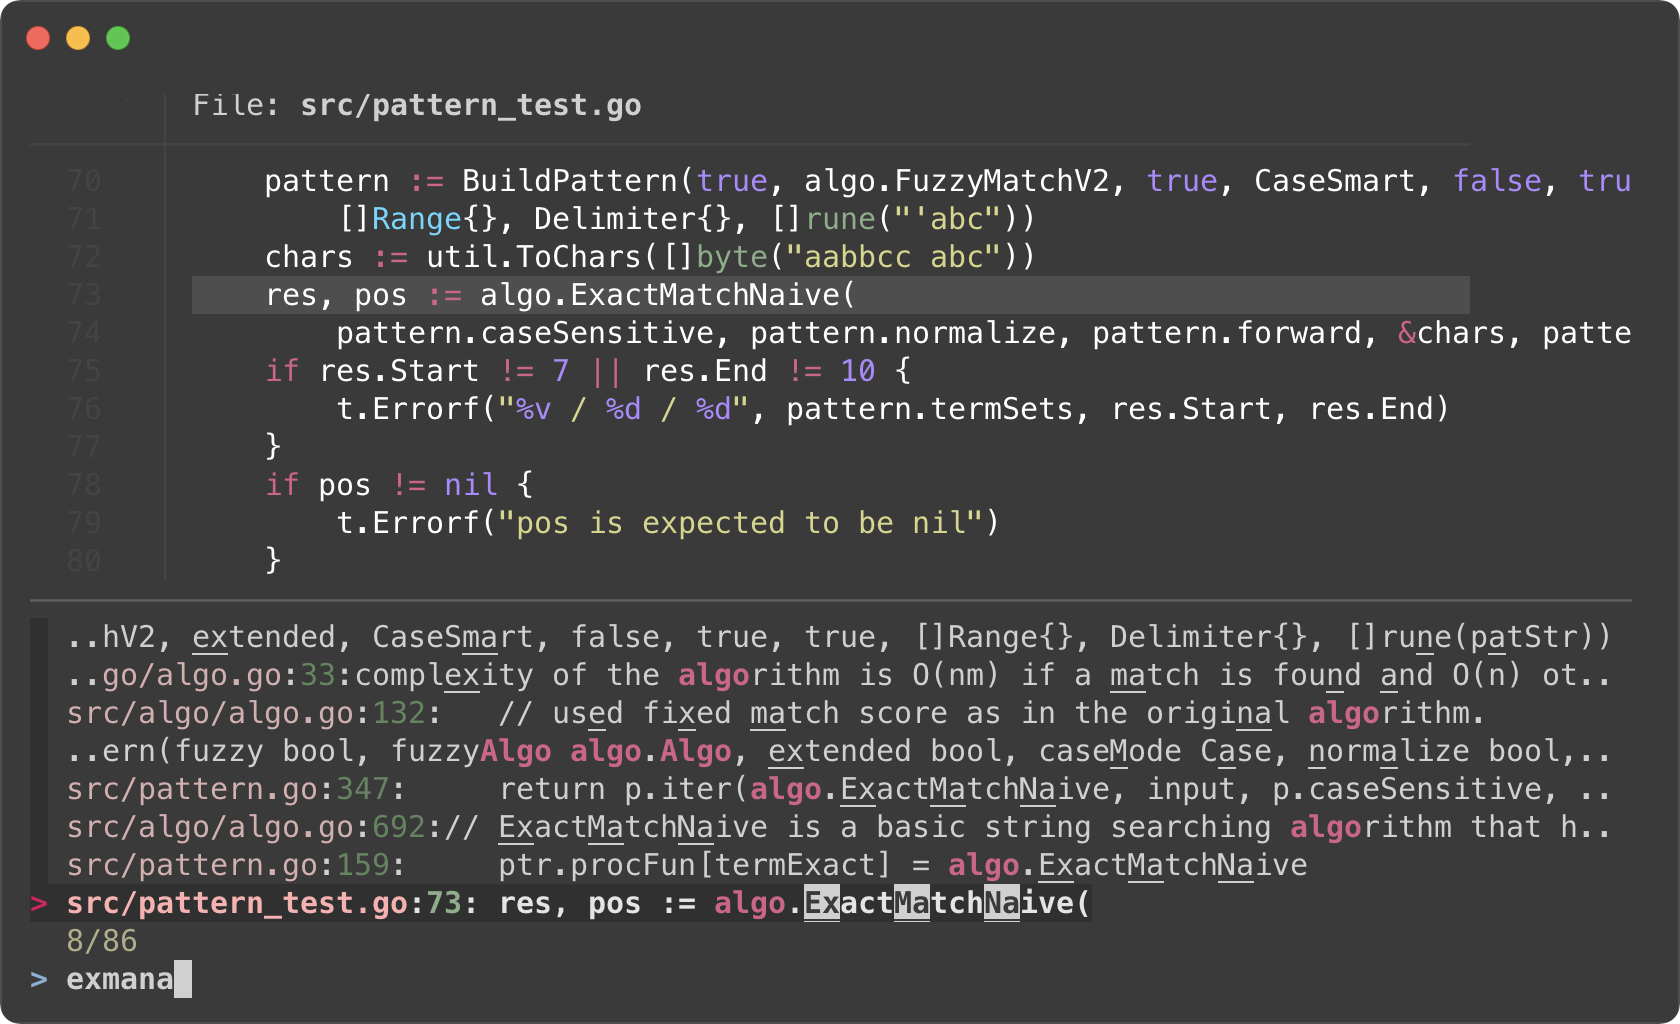
In the next example, Ripgrep is the primary filter that searches for the given
text in files, and fzf is used as the secondary fuzzy filter that adds
interactivity to the workflow. And we use [bat][bat] to show the matching line in
the preview window.
This is a bash script and it will not run as expected on other non-compliant
shells. To avoid the compatibility issue, let's save this snippet as a script
file called `rfv`.
```bash
#!/usr/bin/env bash
# 1. Search for text in files using Ripgrep
# 2. Interactively narrow down the list using fzf
# 3. Open the file in Vim
IFS=: read -ra selected < <(
rg --color=always --line-number --no-heading --smart-case "${*:-}" |
fzf --ansi \
--color "hl:-1:underline,hl+:-1:underline:reverse" \
--delimiter : \
--preview 'bat --color=always {1} --highlight-line {2}' \
--preview-window 'up,60%,border-bottom,+{2}+3/3,~3'
)
[ -n "${selected[0]}" ] && vim "${selected[0]}" "+${selected[1]}"
```
And run it with an initial query string.
```sh
# Make the script executable
chmod +x rfv
# Run it with the initial query "algo"
./rfv algo
```
> Ripgrep will perform the initial search and list all the lines that contain
`algo`. Then we further narrow down the list on fzf.
I know it's a lot to digest, let's try to break down the code.
- Ripgrep prints the matching lines in the following format
```
man/man1/fzf.1:54:.BI "--algo=" TYPE
man/man1/fzf.1:55:Fuzzy matching algorithm (default: v2)
man/man1/fzf.1:58:.BR v2 " Optimal scoring algorithm (quality)"
src/pattern_test.go:7: "github.com/junegunn/fzf/src/algo"
```
The first token delimited by `:` is the file path, and the second token is
the line number of the matching line. They respectively correspond to `{1}`
and `{2}` in the preview command.
- `--preview 'bat --color=always {1} --highlight-line {2}'`
- As we run `rg` with `--color=always` option, we should tell fzf to parse
ANSI color codes in the input by setting `--ansi`.
- We customize how fzf colors various text elements using `--color` option.
`-1` tells fzf to keep the original color from the input. See `man fzf` for
available color options.
- The value of `--preview-window` option consists of 5 components delimited
by `,`
1. `up` — Position of the preview window
1. `60%` — Size of the preview window
1. `border-bottom` — Preview window border only on the bottom side
1. `+{2}+3/3` — Scroll offset of the preview contents
1. `~3` — Fixed header
- Let's break down the latter two. We want to display the bat output in the
preview window with a certain scroll offset so that the matching line is
positioned near the center of the preview window.
- `+{2}` — The base offset is extracted from the second token
- `+3` — We add 3 lines to the base offset to compensate for the header
part of `bat` output
- ```
───────┬──────────────────────────────────────────────────────────
│ File: CHANGELOG.md
───────┼──────────────────────────────────────────────────────────
1 │ CHANGELOG
2 │ =========
3 │
4 │ 0.26.0
5 │ ------
```
- `/3` adjusts the offset so that the matching line is shown at a third
position in the window
- `~3` makes the top three lines fixed header so that they are always
visible regardless of the scroll offset
- Once we selected a line, we open the file with `vim` (`vim
"${selected[0]}"`) and move the cursor to the line (`+${selected[1]}`).
### Using fzf as interative Ripgrep launcher
We have learned that we can bind `reload` action to a key (e.g.
`--bind=ctrl-r:execute(ps -ef)`). In the next example, we are going to **bind
`reload` action to `change` event** so that whenever the user *changes* the
query string on fzf, `reload` action is triggered.
Here is a variation of the above `rfv` script. fzf will restart Ripgrep every
time the user updates the query string on fzf. Searching and filtering is
completely done by Ripgrep, and fzf merely provides the interactive interface.
So we lose the "fuzziness", but the performance will be better on larger
projects, and it will free up memory as you narrow down the results.
```bash
#!/usr/bin/env bash
# 1. Search for text in files using Ripgrep
# 2. Interactively restart Ripgrep with reload action
# 3. Open the file in Vim
RG_PREFIX="rg --column --line-number --no-heading --color=always --smart-case "
INITIAL_QUERY="${*:-}"
IFS=: read -ra selected < <(
FZF_DEFAULT_COMMAND="$RG_PREFIX $(printf %q "$INITIAL_QUERY")" \
fzf --ansi \
--disabled --query "$INITIAL_QUERY" \
--bind "change:reload:sleep 0.1; $RG_PREFIX {q} || true" \
--delimiter : \
--preview 'bat --color=always {1} --highlight-line {2}' \
--preview-window 'up,60%,border-bottom,+{2}+3/3,~3'
)
[ -n "${selected[0]}" ] && vim "${selected[0]}" "+${selected[1]}"
```
- Instead of starting fzf in `rg ... | fzf` form, we start fzf without an
explicit input, but with a custom `FZF_DEFAULT_COMMAND` variable. This way
fzf can kill the initial Ripgrep process it starts with the initial query.
Otherwise, the initial Ripgrep process will keep consuming system resources
even after `reload` is triggered.
- Filtering is no longer a responsibitiliy of fzf; hence `--disabled`
- `{q}` in the reload command evaluates to the query string on fzf prompt.
- `sleep 0.1` in the reload command is for "debouncing". This small delay will
reduce the number of intermediate Ripgrep processes while we're typing in
a query.
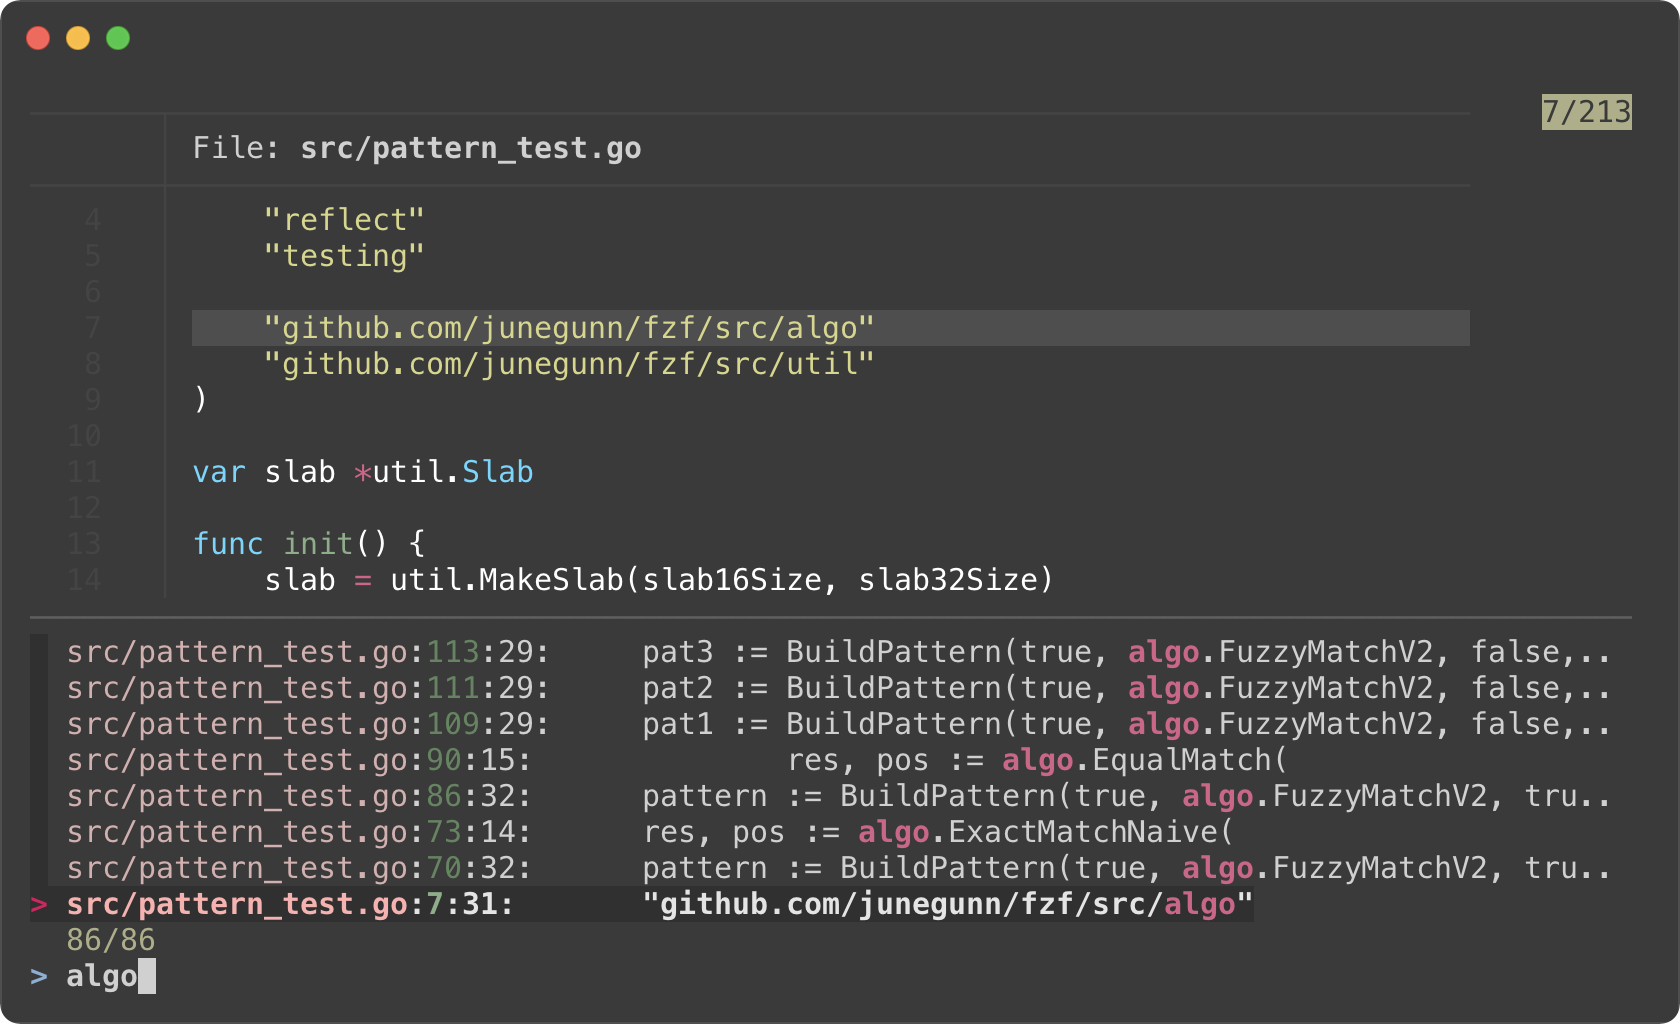
### Switching to fzf-only search mode
*(Requires fzf 0.27.1 or above)*
In the previous example, we lost fuzzy matching capability as we completely
delegated search functionality to Ripgrep. But we can dynamically switch to
fzf-only search mode by *"unbinding"* `reload` action from `change` event.
```sh
#!/usr/bin/env bash
# Two-phase filtering with Ripgrep and fzf
#
# 1. Search for text in files using Ripgrep
# 2. Interactively restart Ripgrep with reload action
# * Press alt-enter to switch to fzf-only filtering
# 3. Open the file in Vim
RG_PREFIX="rg --column --line-number --no-heading --color=always --smart-case "
INITIAL_QUERY="${*:-}"
IFS=: read -ra selected < <(
FZF_DEFAULT_COMMAND="$RG_PREFIX $(printf %q "$INITIAL_QUERY")" \
fzf --ansi \
--color "hl:-1:underline,hl+:-1:underline:reverse" \
--disabled --query "$INITIAL_QUERY" \
--bind "change:reload:sleep 0.1; $RG_PREFIX {q} || true" \
--bind "alt-enter:unbind(change,alt-enter)+change-prompt(2. fzf> )+enable-search+clear-query" \
--prompt '1. ripgrep> ' \
--delimiter : \
--preview 'bat --color=always {1} --highlight-line {2}' \
--preview-window 'up,60%,border-bottom,+{2}+3/3,~3'
)
[ -n "${selected[0]}" ] && vim "${selected[0]}" "+${selected[1]}"
```
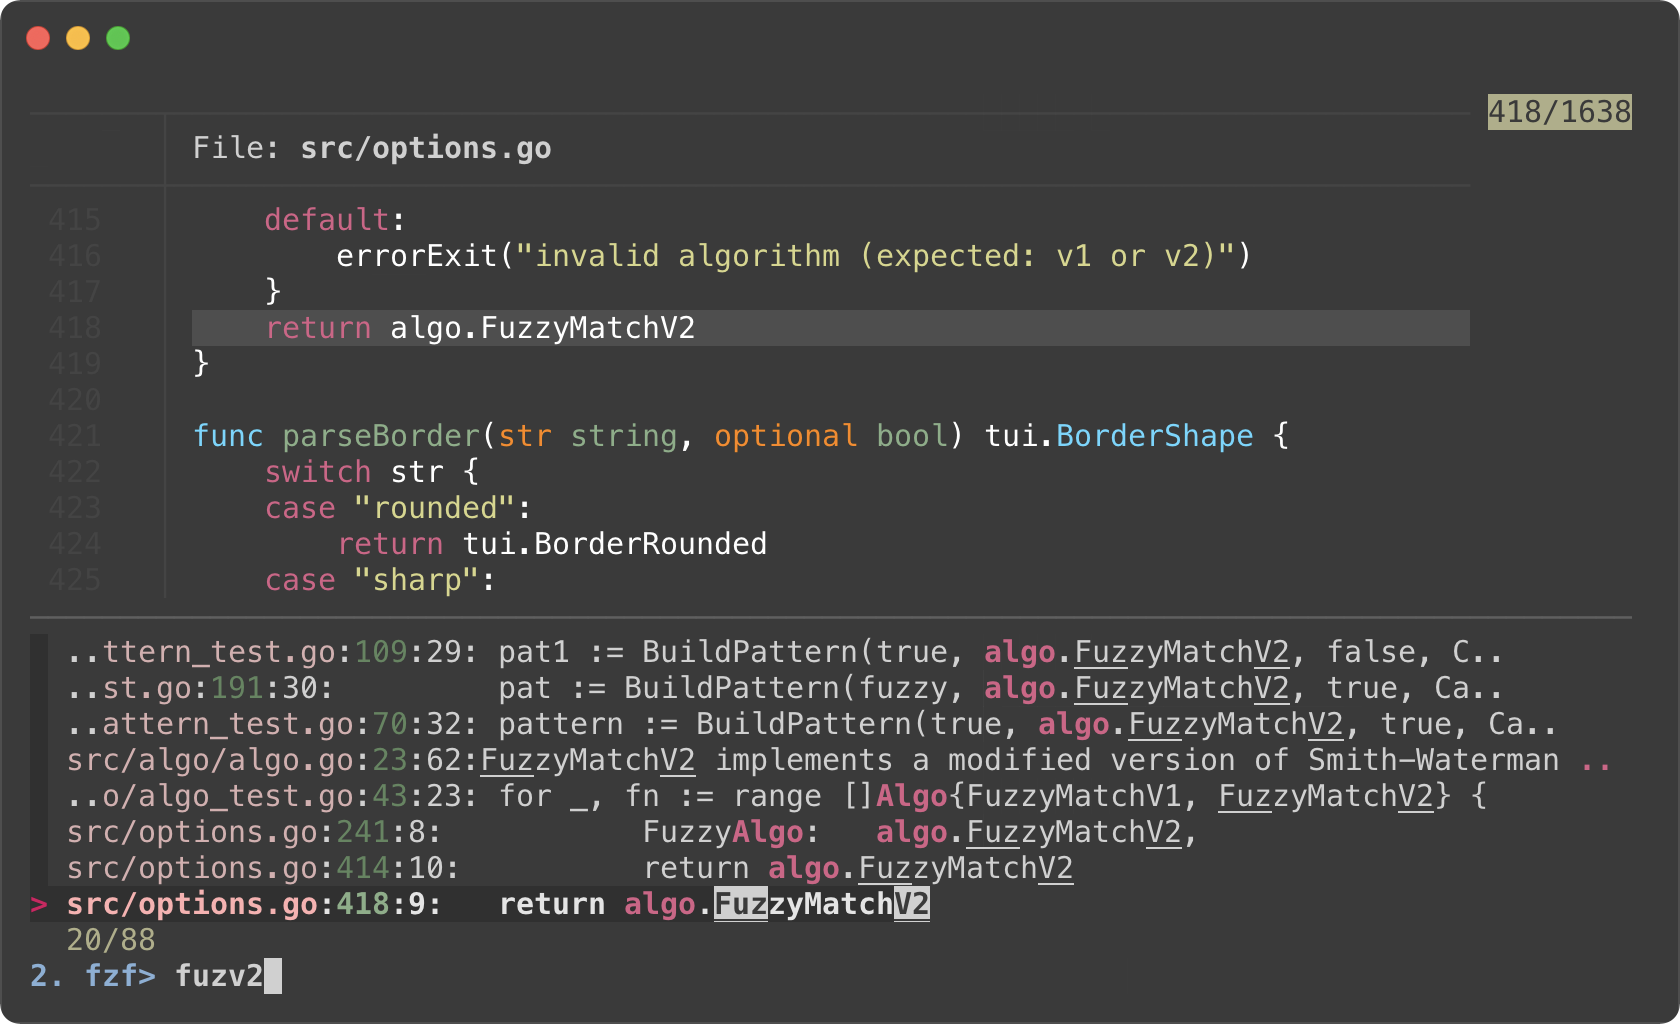
* Phase 1. Filtering with Ripgrep
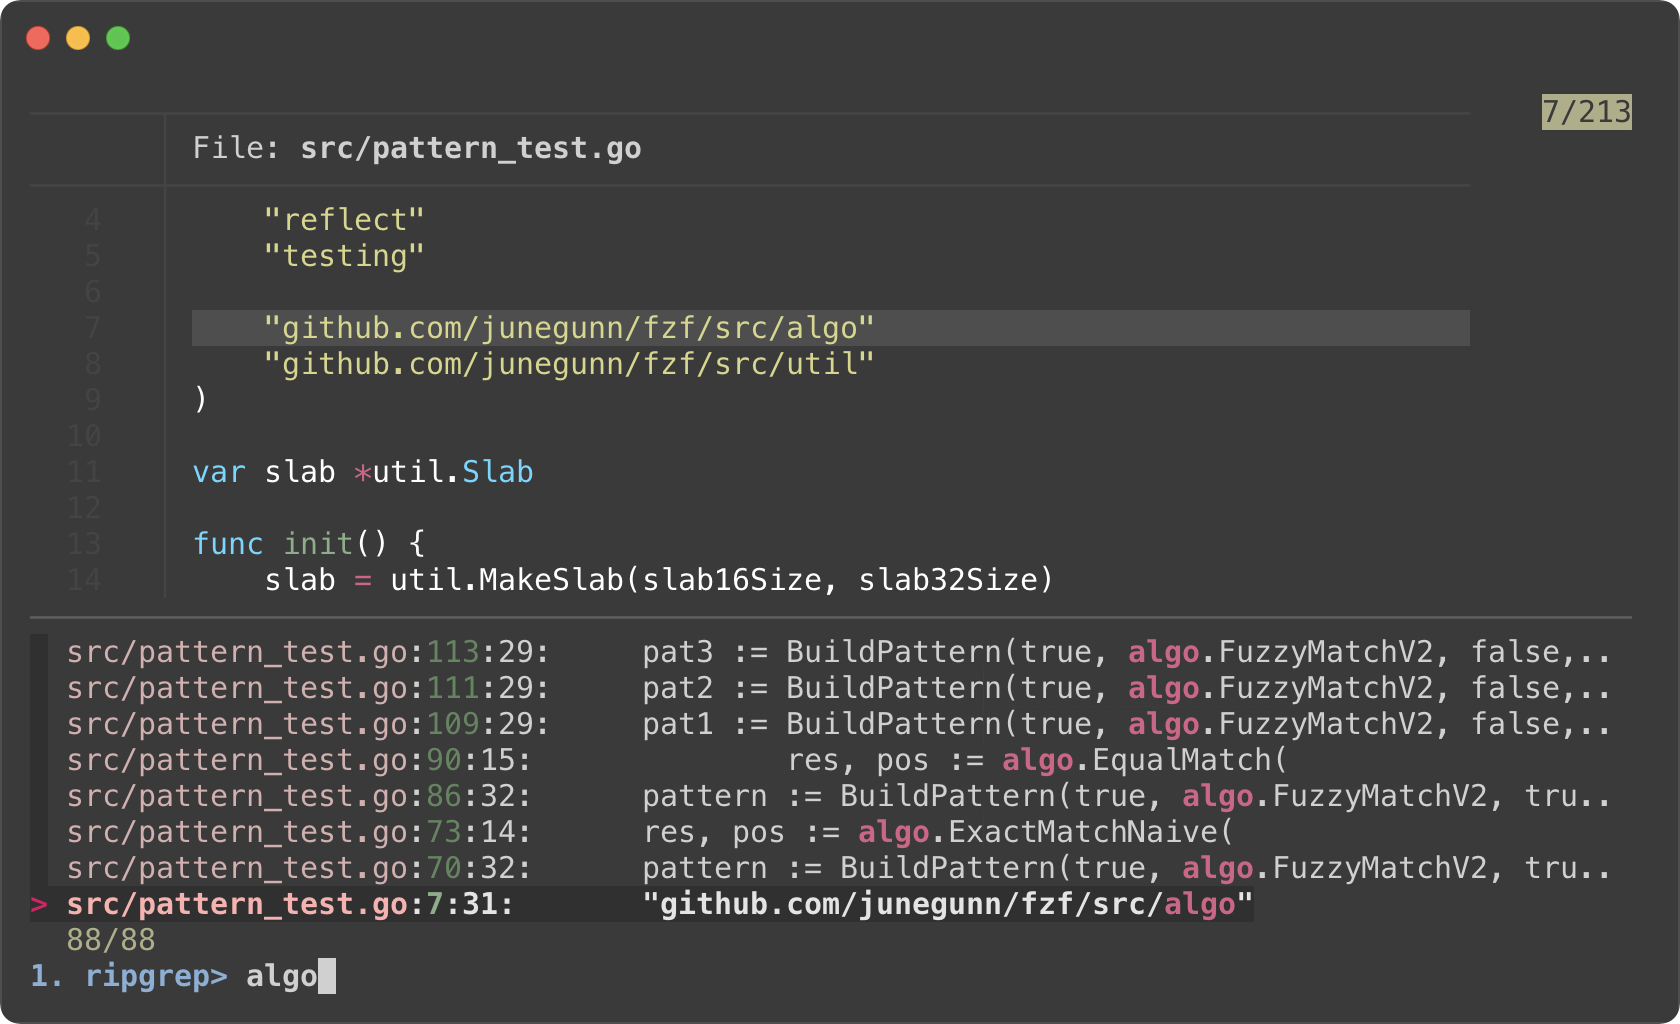
* Phase 2. Filtering with fzf
- We added `--prompt` option to show that fzf is initially running in "Ripgrep
launcher mode".
- We added `alt-enter` binding that
1. unbinds `change` event, so Ripgrep is no longer restarted on key press
2. changes the prompt to `2. fzf>`
3. enables search functionality of fzf
4. clears the current query string that was used to start Ripgrep process
5. and unbinds `alt-enter` itself as this is a one-off event
- We reverted `--color` option for customizing how the matching chunks are
displayed in the second phase
Log tailing
-----------
fzf can run long-running preview commands and render partial results before
completion. And when you specify `follow` flag in `--preview-window` option,
fzf will "`tail -f`" the result, automatically scrolling to the bottom.
```bash
# With "follow", preview window will automatically scroll to the bottom.
# "\033[2J" is an ANSI escape sequence for clearing the screen.
# When fzf reads this code it clears the previous preview contents.
fzf --preview-window follow --preview 'for i in $(seq 100000); do
echo "$i"
sleep 0.01
(( i % 300 == 0 )) && printf "\033[2J"
done'
```
Admittedly, that was a silly example. Here's a practical one for browsing
Kubernetes pods.
```bash
#!/usr/bin/env bash
read -ra tokens < <(
kubectl get pods --all-namespaces |
fzf --info=inline --layout=reverse --header-lines=1 --border \
--prompt "$(kubectl config current-context | sed 's/-context$//')> " \
--header $'Press CTRL-O to open log in editor\n\n' \
--bind ctrl-/:toggle-preview \
--bind 'ctrl-o:execute:${EDITOR:-vim} <(kubectl logs --namespace {1} {2}) > /dev/tty' \
--preview-window up,follow \
--preview 'kubectl logs --follow --tail=100000 --namespace {1} {2}' "$@"
)
[ ${#tokens} -gt 1 ] &&
kubectl exec -it --namespace "${tokens[0]}" "${tokens[1]}" -- bash
```
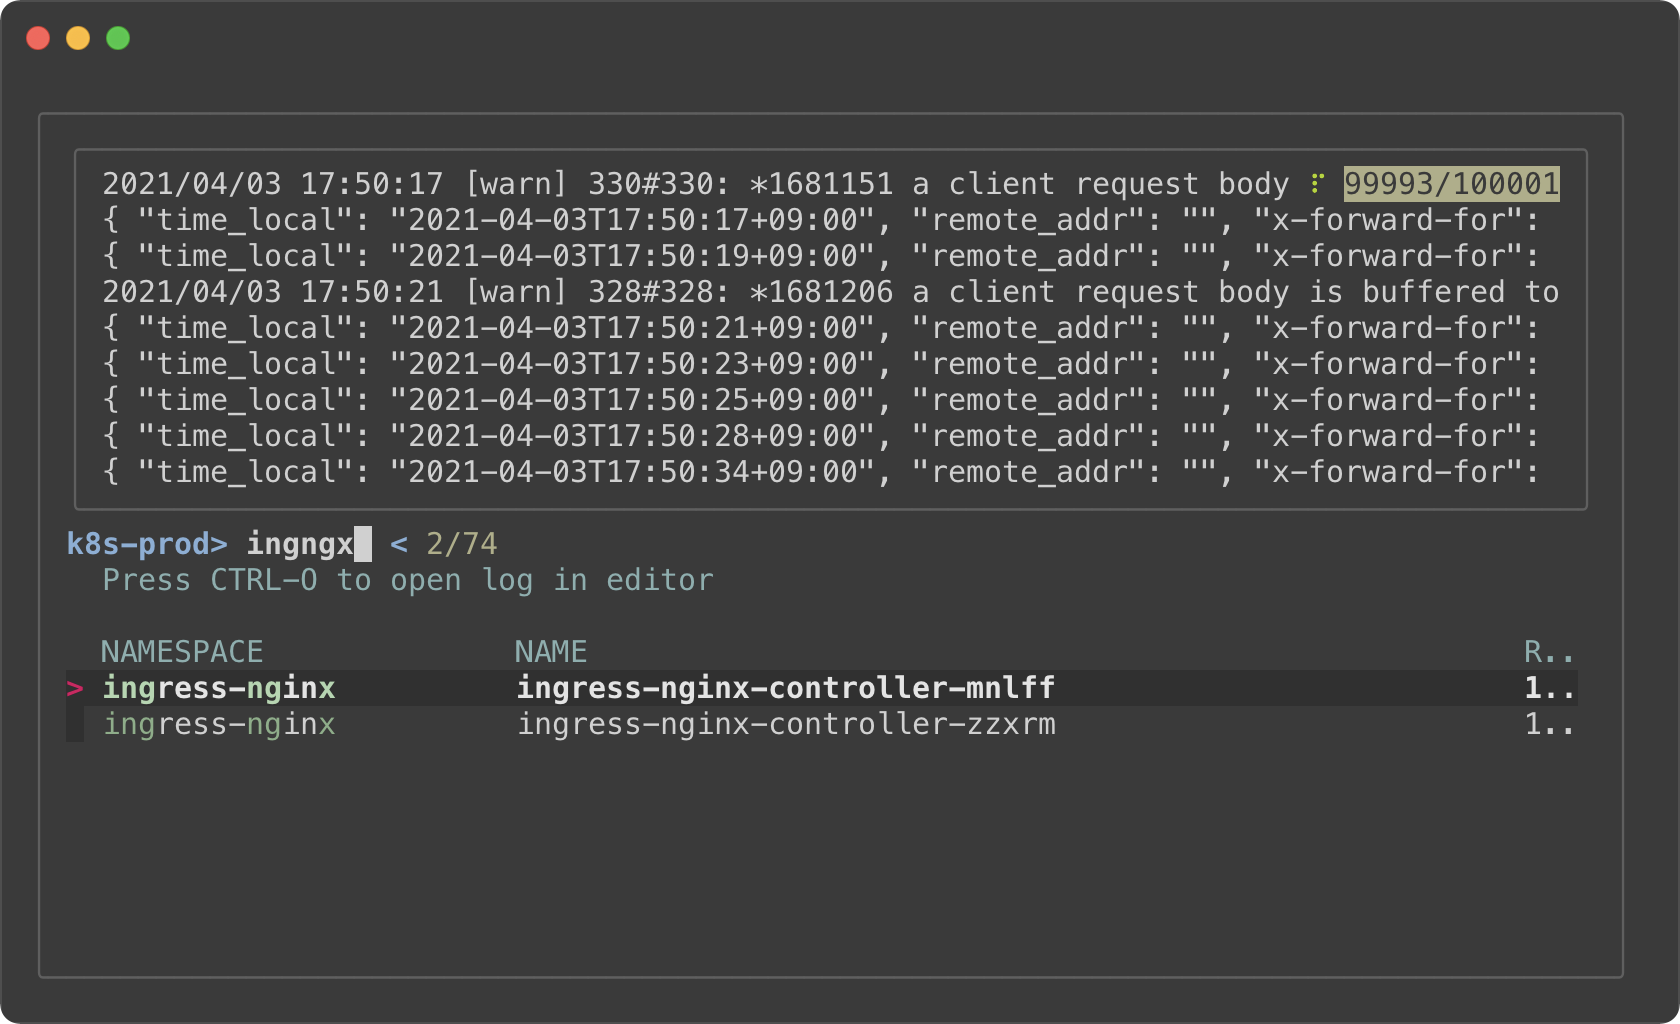
- The preview window will *"log tail"* the pod
- Holding on to a large amount of log will consume a lot of memory. So we
limited the initial log amount with `--tail=100000`.
- With `execute` binding, you can press CTRL-O to open the log in your editor
without leaving fzf
- Select a pod (with an enter key) to `kubectl exec` into it
Key bindings for git objects
----------------------------
I have [blogged](https://junegunn.kr/2016/07/fzf-git) about my fzf+git key
bindings a few years ago. I'm going to show them here again, because they are
seriously useful.
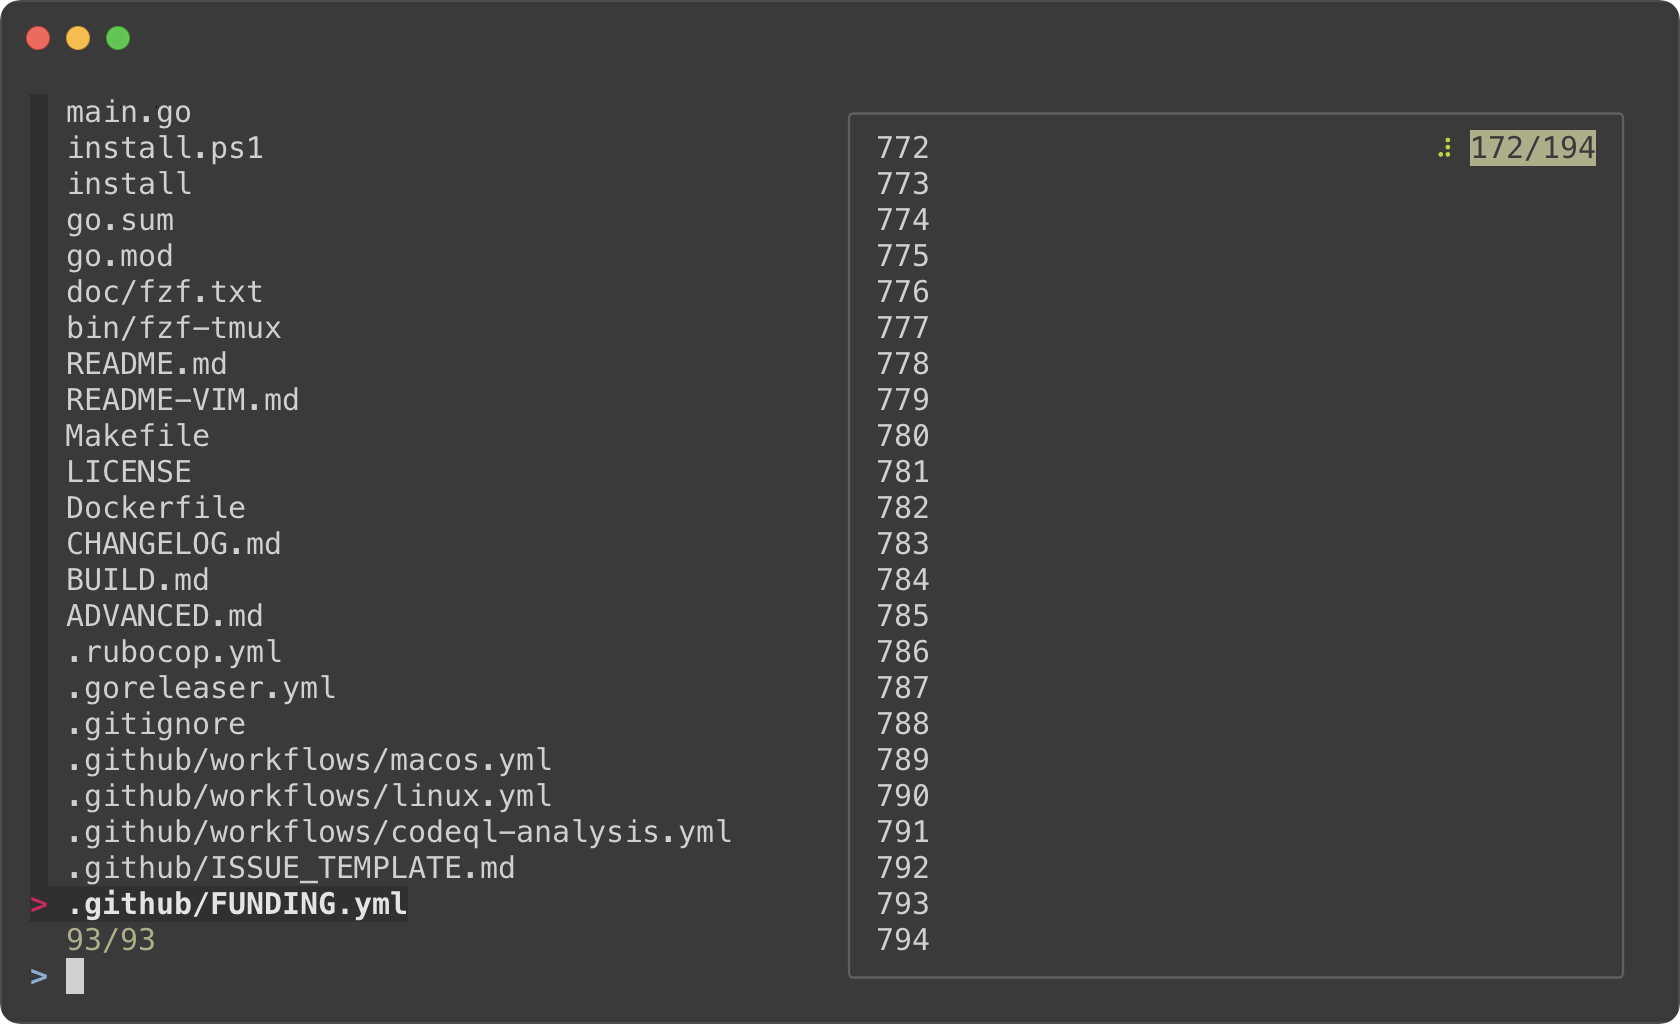
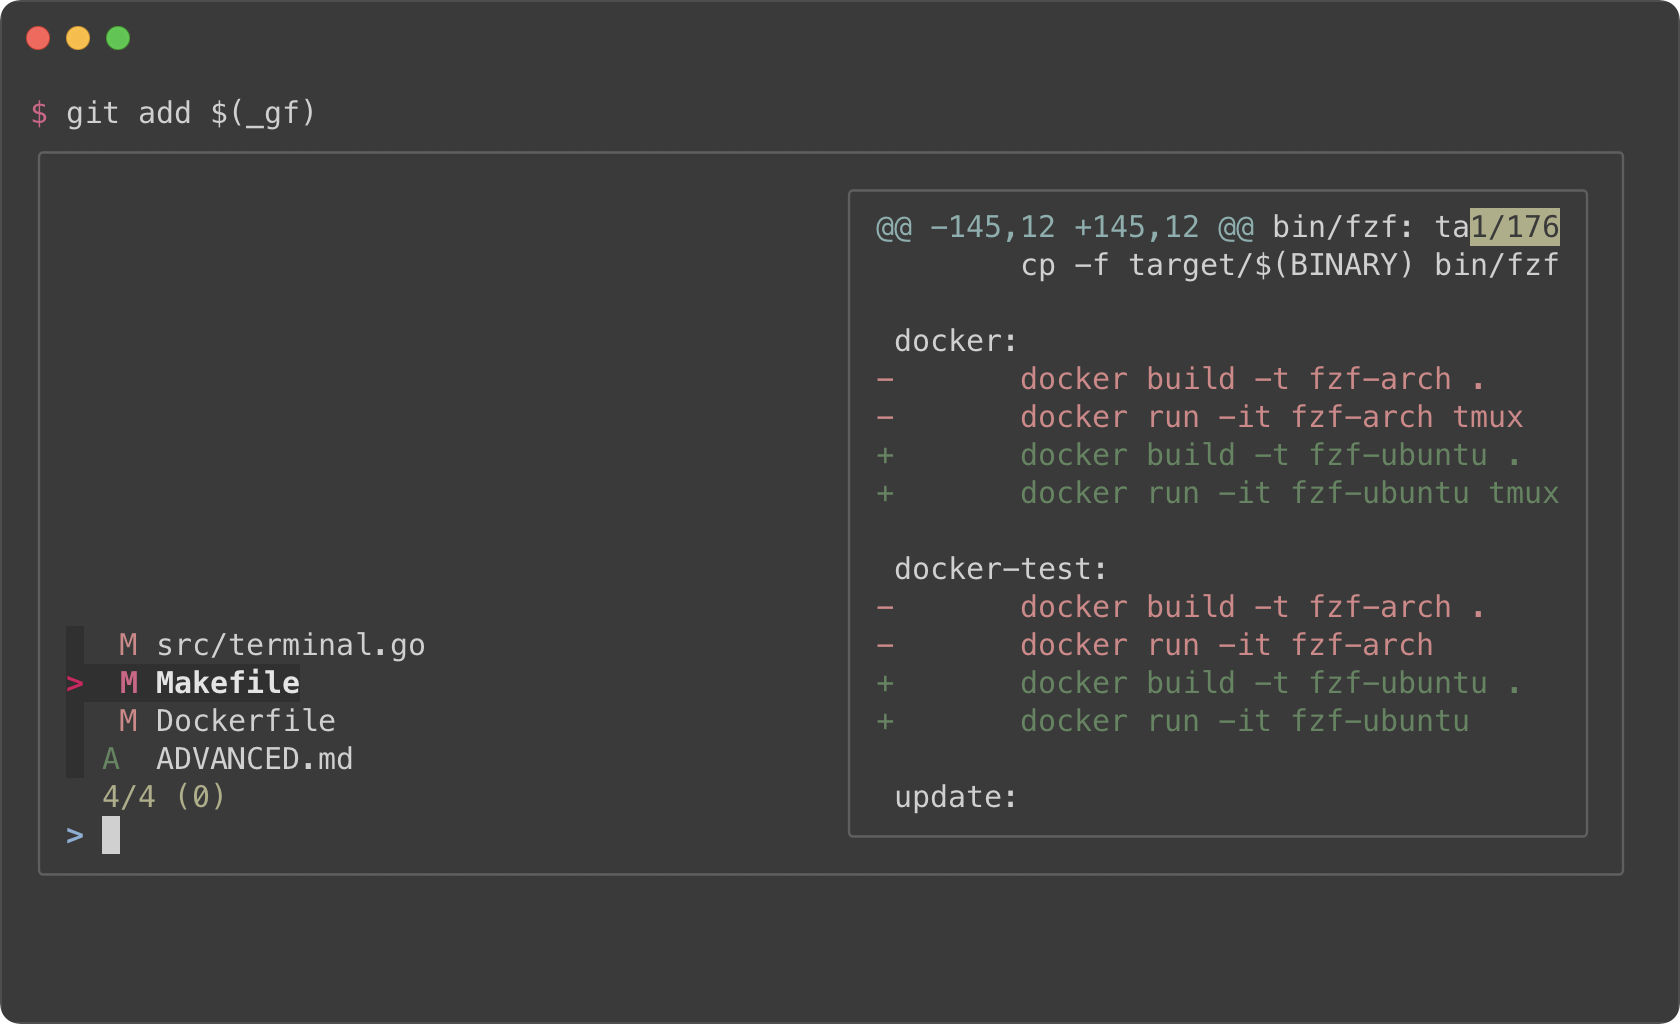
### Files listed in `git status`
CTRL-GCTRL-F
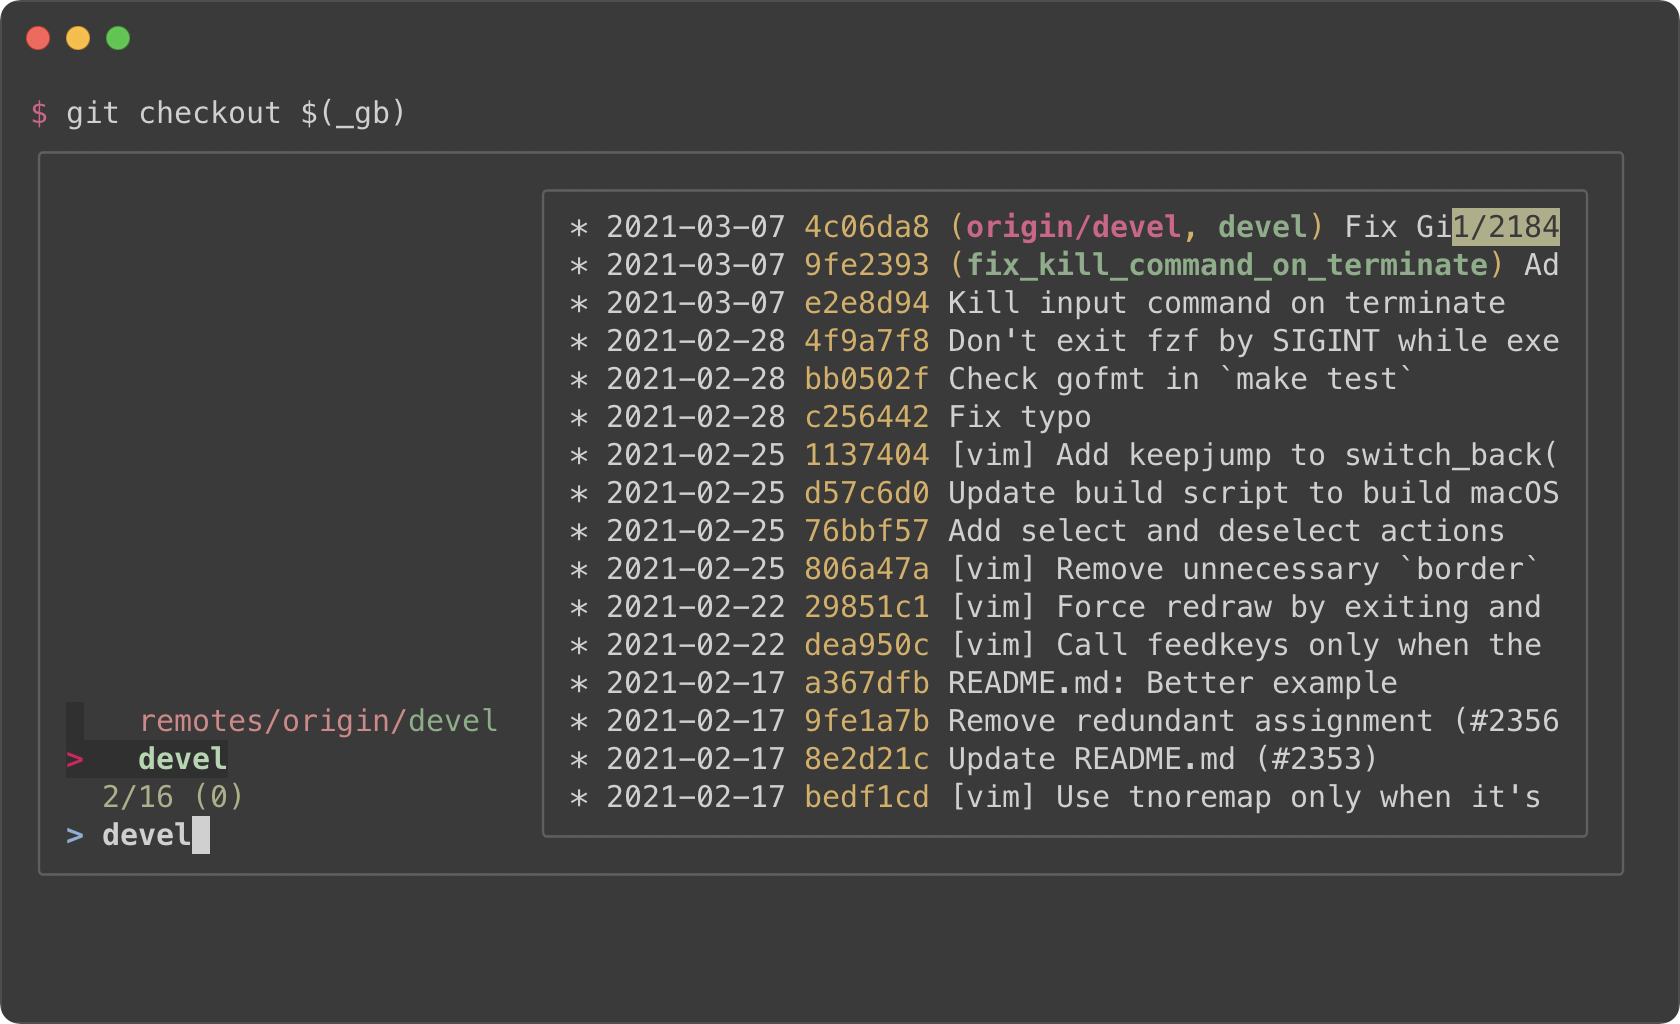
### Branches
CTRL-GCTRL-B
### Commit hashes
CTRL-GCTRL-H

The full source code can be found [here](https://gist.github.com/junegunn/8b572b8d4b5eddd8b85e5f4d40f17236).
Color themes
------------
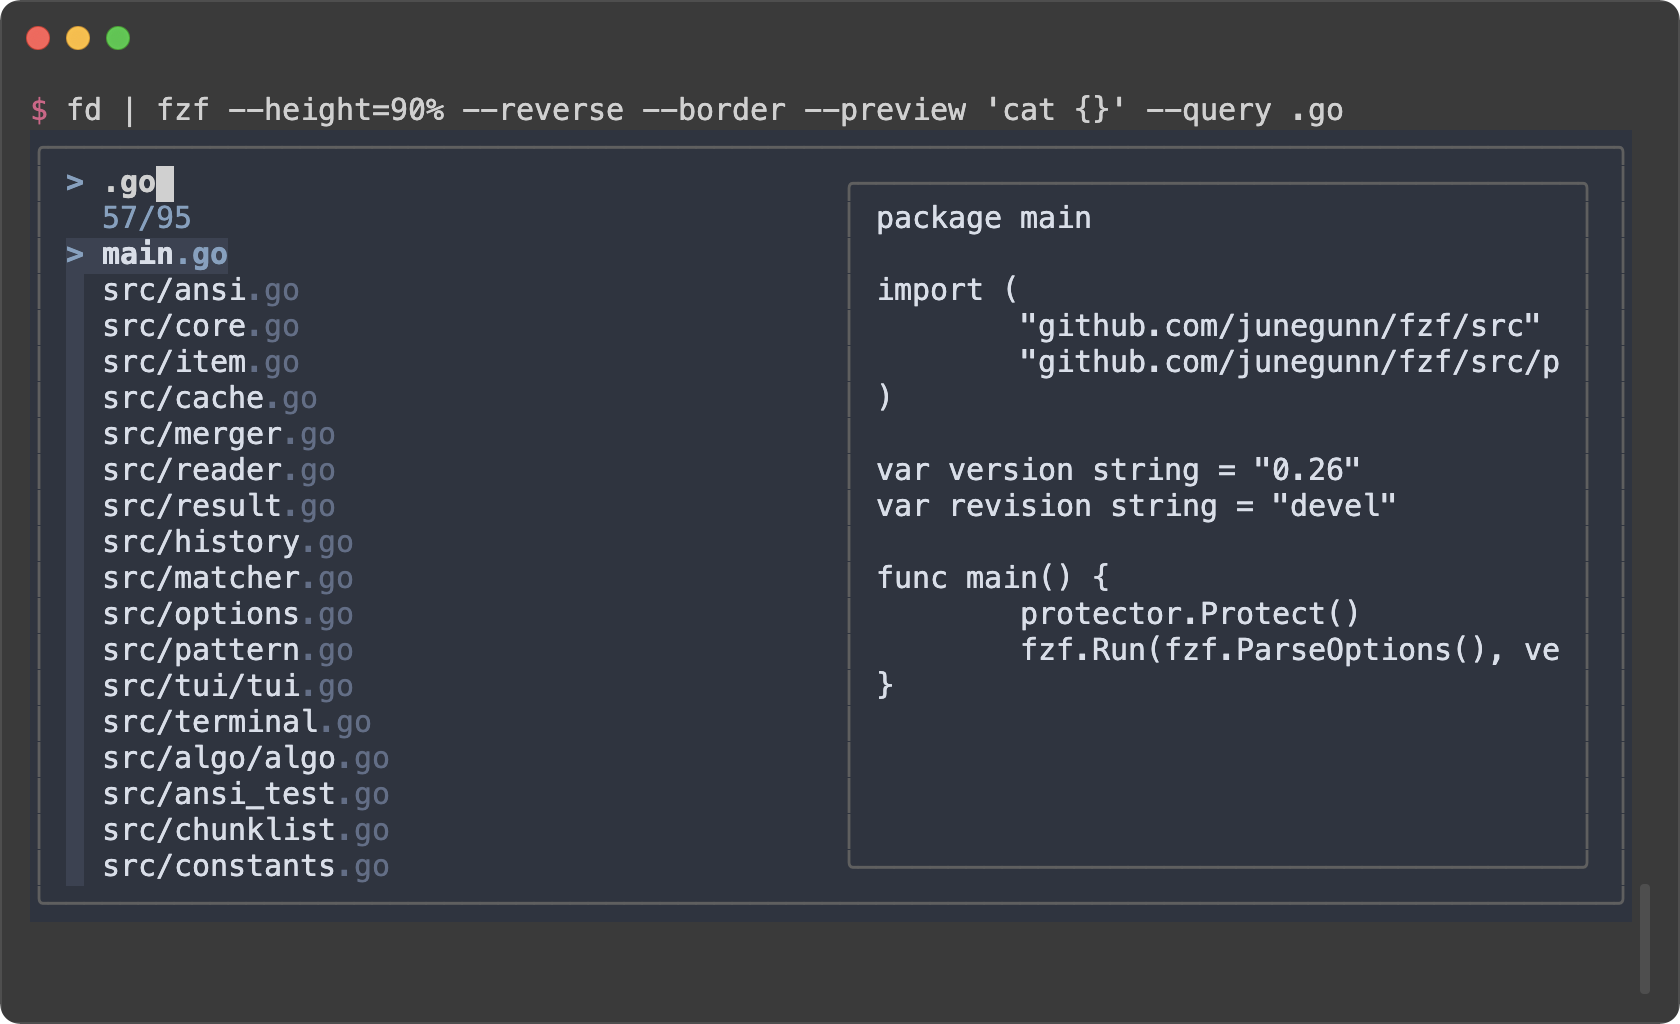
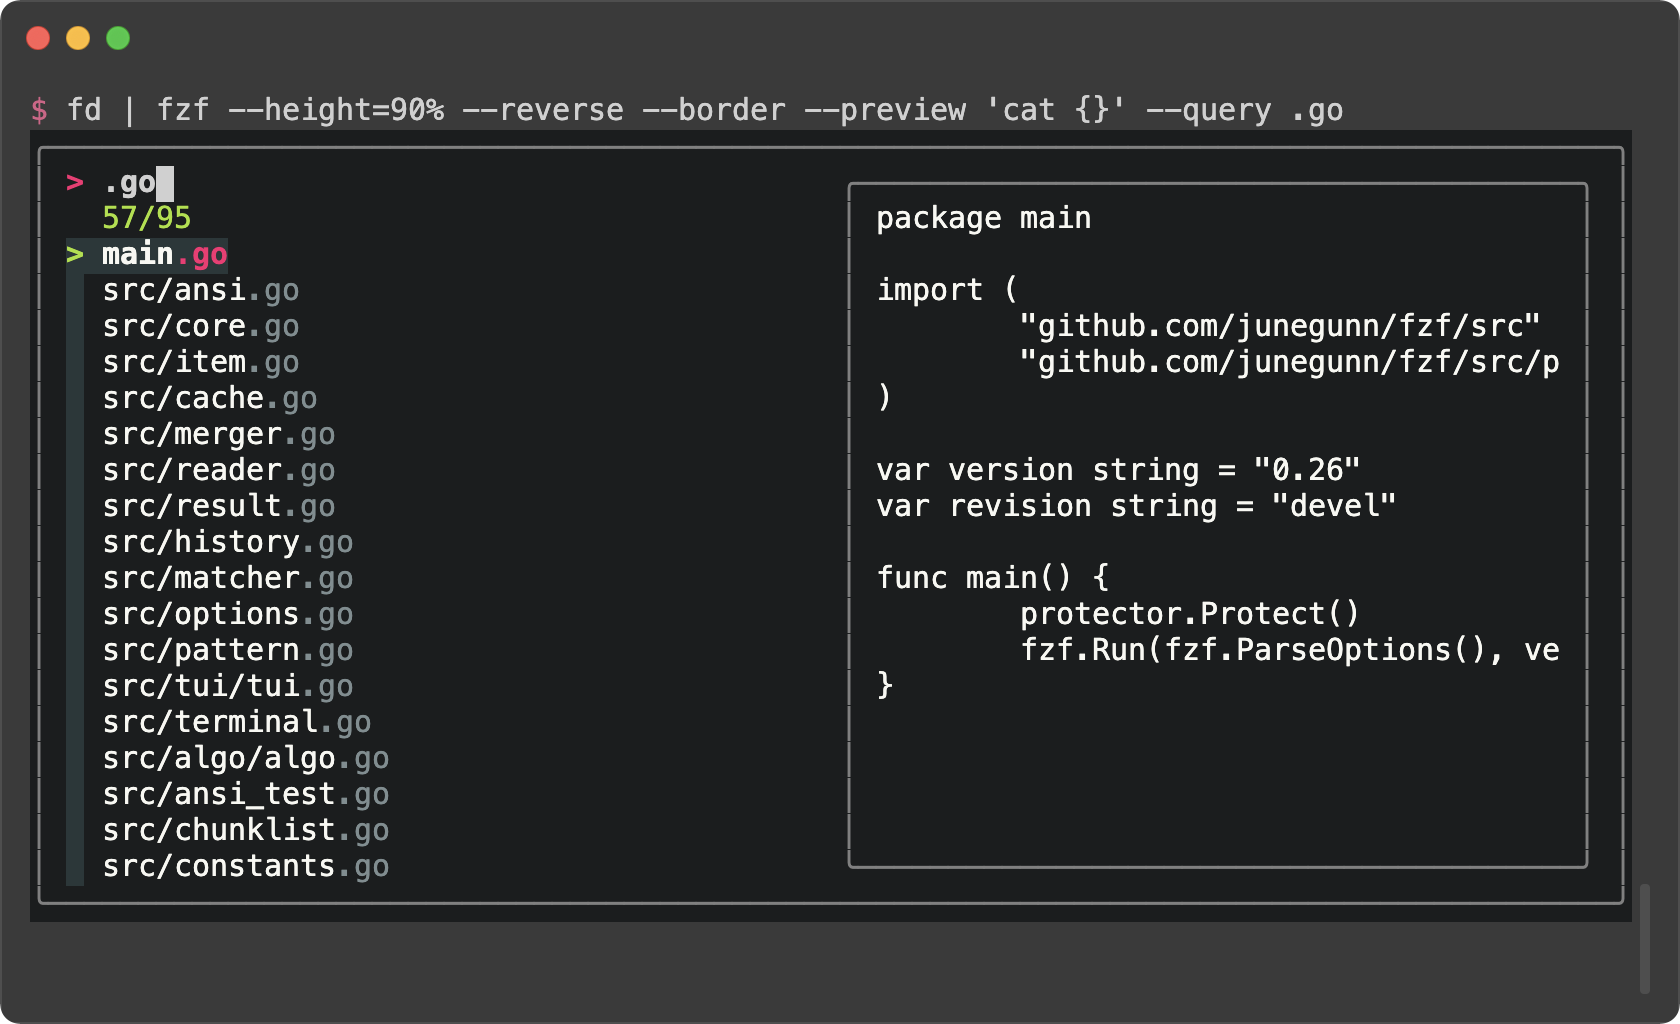
You can customize how fzf colors the text elements with `--color` option. Here
are a few color themes. Note that you need a terminal emulator that can
display 24-bit colors.
```sh
# junegunn/seoul256.vim (dark)
export FZF_DEFAULT_OPTS='--color=bg+:#3F3F3F,bg:#4B4B4B,border:#6B6B6B,spinner:#98BC99,hl:#719872,fg:#D9D9D9,header:#719872,info:#BDBB72,pointer:#E12672,marker:#E17899,fg+:#D9D9D9,preview-bg:#3F3F3F,prompt:#98BEDE,hl+:#98BC99'
```
```sh
# junegunn/seoul256.vim (light)
export FZF_DEFAULT_OPTS='--color=bg+:#D9D9D9,bg:#E1E1E1,border:#C8C8C8,spinner:#719899,hl:#719872,fg:#616161,header:#719872,info:#727100,pointer:#E12672,marker:#E17899,fg+:#616161,preview-bg:#D9D9D9,prompt:#0099BD,hl+:#719899'
```
```sh
# morhetz/gruvbox
export FZF_DEFAULT_OPTS='--color=bg+:#3c3836,bg:#32302f,spinner:#fb4934,hl:#928374,fg:#ebdbb2,header:#928374,info:#8ec07c,pointer:#fb4934,marker:#fb4934,fg+:#ebdbb2,prompt:#fb4934,hl+:#fb4934'
```

```sh
# arcticicestudio/nord-vim
export FZF_DEFAULT_OPTS='--color=bg+:#3B4252,bg:#2E3440,spinner:#81A1C1,hl:#616E88,fg:#D8DEE9,header:#616E88,info:#81A1C1,pointer:#81A1C1,marker:#81A1C1,fg+:#D8DEE9,prompt:#81A1C1,hl+:#81A1C1'
```
```sh
# tomasr/molokai
export FZF_DEFAULT_OPTS='--color=bg+:#293739,bg:#1B1D1E,border:#808080,spinner:#E6DB74,hl:#7E8E91,fg:#F8F8F2,header:#7E8E91,info:#A6E22E,pointer:#A6E22E,marker:#F92672,fg+:#F8F8F2,prompt:#F92672,hl+:#F92672'
```
### Generating fzf color theme from Vim color schemes
The Vim plugin of fzf can generate `--color` option from the current color
scheme according to `g:fzf_colors` variable. You can find the detailed
explanation [here](https://github.com/junegunn/fzf/blob/master/README-VIM.md#explanation-of-gfzf_colors).
Here is an example. Add this to your Vim configuration file.
```vim
let g:fzf_colors =
\ { 'fg': ['fg', 'Normal'],
\ 'bg': ['bg', 'Normal'],
\ 'preview-bg': ['bg', 'NormalFloat'],
\ 'hl': ['fg', 'Comment'],
\ 'fg+': ['fg', 'CursorLine', 'CursorColumn', 'Normal'],
\ 'bg+': ['bg', 'CursorLine', 'CursorColumn'],
\ 'hl+': ['fg', 'Statement'],
\ 'info': ['fg', 'PreProc'],
\ 'border': ['fg', 'Ignore'],
\ 'prompt': ['fg', 'Conditional'],
\ 'pointer': ['fg', 'Exception'],
\ 'marker': ['fg', 'Keyword'],
\ 'spinner': ['fg', 'Label'],
\ 'header': ['fg', 'Comment'] }
```
Then you can see how the `--color` option is generated by printing the result
of `fzf#wrap()`.
```vim
:echo fzf#wrap()
```
Use this command to append `export FZF_DEFAULT_OPTS="..."` line to the end of
the current file.
```vim
:call append('$', printf('export FZF_DEFAULT_OPTS="%s"', matchstr(fzf#wrap().options, "--color[^']*")))
```